Linux is one of the best operating systems, especially for servers. The reason is simple. It is one of the most secure operating systems and is available for free, unlike Windows, for which you need to pay a monthly license fee.
Like other operating systems, Linux is also not immune to different threats. That is why you should know how to Secure Linux Server to get the best out of it.
The Setup
We used the following setup to test our Linux server, and this article is based on this setup. The tips mentioned here may also apply to other setups, but you must test them before going live.
- Operating System: Ubuntu ( Linux)
- Server: Open Lite Speed ( Free Version of Lite Speed Server)
- Cache: Lite Speed Cache
- Firewall: CSF / UFS ( Depending on your preference)
- Control Panel: Cyber panel ( You can choose not to use Cyberpanel and do everything using CLI)
- Tested On: Vultr, Digital Ocean, Linode
Before we discuss how to Secure a Linux Server, let’s learn how to set one up.
In the following example, we have decided to pick Vultr. However, the process will be similar for other vendors, too.
Here are the tips that you can implement to secure your Linux server.
Table of Contents
1. Access Server On SSH
It is always better to access your server over SSH than using passwords. Passwords can be easily cracked and are also vulnerable to brute-force attacks, phishing, and human errors.
SSH uses a key pair that is very difficult to hack. To authenticate, you need to match the public key available on the server with the private key available on your computer.
Anyone who wants to access your server should have a private key in their system. You can not even log in to the server from other computers if that computer does not have the private key.
To generate an SSH key, you can use the OpenSSH Client for Windows. The detailed process can be found here.
Here are some of the commands that you should use for Ubuntu
To update package index files.
sudo apt-get updateTo upgrade the newest versions of all installed packages.
sudo apt-get upgradeTo reboot a Linux machine.
sudo rebootTo access the server on SSH, type the following command in the command prompt. You need to change the IP address with your IP address.
ssh root@202.30.40.50If you have changed the IP address or rebuilt the server, you may see the error “Host key verification failed.” In that case, run the following command before you connect to your server. Replace the following IP address with your new IP address.
ssh-keygen -R 202.30.40.60If you get the error that the private key does not have an allowed IP address, run the following command.
ssh -o HostKeyAlias=202.30.40.60 root@202.30.40.602. Install And Set UFW Firewall (Ubuntu Only)
You should install the UFW firewall only if you use Ubuntu and have no control panel installed. Control panels usually come with their firewall. Installing two firewalls is not recommended.
Enable iP6 (If it is not enabled by default)
Run the following command to allow iP6
sudo nano /etc/default/ufwPlease find the following line and change it.
IPV6=yesInstall UFW
To install UFW, run the following command
sudo apt install ufwSet UFW Default Policies
The following default policies say that all incoming connections will be blocked unless you allow some specific connections. All outgoing connections will be opened by default.
ufw default deny incoming
ufw default allow outgoing
Allow SSH
To allow SSH connection, use the following firewall role in UFW
sudo ufw allow sshTo enable SSH default port 22, use the following command ( Please note that port 22 is the default SSH port in Linux; you should never keep port 22 open for security reasons)
sudo ufw allow 22if you want to allow any port other than port 22, you can use the following command. Add port number as required.
sudo ufw allow 1111
sudo ufw allow 1200
To allow HTTP and HTTPS ports, you should add the following rule
sudo ufw allow 80
sudo ufw allow 443
To allow Cyber Panel,Portn port 8090. However, it would help if you changed the cyber panel port, too, for security reasons
sudo ufw allow 8090/tcpEnable UFW
To enable UFW, run the following command
sudo ufw enableTo see the UFW status, run the following command
UFW Status
To see the UFW firewall status, run the following command
sudo ufw statusTo see the detailed UFW firewall rules, run the following command
sudo ufw status verboseDisable UFW
To disable the UFW firewall, run the following command
sudo ufw disableReset UFW
To reset the UFW firewall, run the following command
sudo ufw resetsudo service sshd restart
3. Disable Port 22 For SSH [ Securing SSH]
Port 22 is the default port for an SSH connection. Hackers often attack throughPorts port. That is why we need to disable port 22 and assign another port for an SSH connection.
First, connect to your server and run the following command. This will open the SSH config file.
sudo nano /etc/ssh/sshd_configFind the #Port 22 line and replace it with another port number you choose. Don’t forget to remove the # bPorte Port.
Port 3450Restart the SSH service
sudo service sshd restartNow open another command prompt window and check if the new port works.
ssh root@202.30.40.50 -p 3450If everything is working fine, reboot the machine
sudo rebootEnjoy! Now, you can connect to your server using your new SSH port.
4. Add A New User And Disable The Root Login
For any Linux server, “root” is the default user. That is why hackers use this root login to access your server. You need to disable root login for server security.
But before that, you need to create a new user and give him the root access so that it can perform all the duties that the root user performs.
First of all, log in to your server using an SSH connection
Add a New User using the following command. For example, we are adding a new user named “sampleuser”. When you run the following command, you will be asked a few questions that you need to answer.
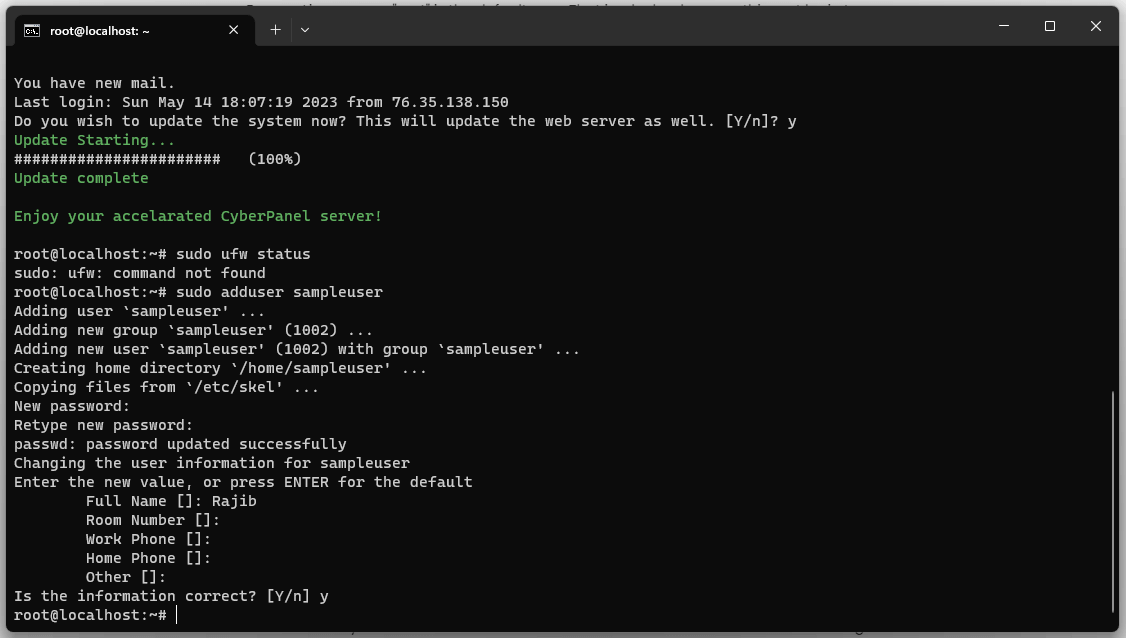
sudo adduser sampleuserAdd the new user to the SUDO group will give him root access
sudo usermod -aG sudo sampleuserTest if Sudo access is given or not
su - sampleuser
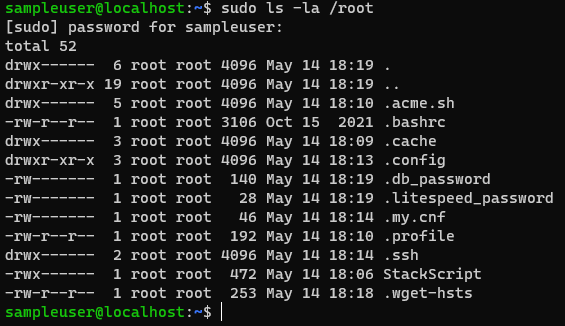
sudo ls -la /root
You should see the following screen showing the new user has root access.
Add an SSH Key for the new user to authenticate himself while connecting to the server.
To do so, you should first create a directory to store the SSH public key.
su - sampleuser
sudo mkdir ~/.ssh
Open the authorized key file and add your SSH public key to that. You will get the ssh public key in C:\users\xxx\.ssh.The following command will open the authorized key file.
sudo nano ~/.ssh/authorized_keysRestart the SSH service.
sudo service sshd restartNow you can connect to your server using the new user login
ssh sampleuser@202.30.40.50Now, it’s time to turn off the root login. First, open the SSH config file by running the following command to do that.
sudo nano /etc/ssh/sshd_configFind the following line in that file that says ” PermitRootLogin yes” and change it to the following.
PermitRootLogin noSave the file and restart the SSH service. That’s it. Your server root login is disabled.
5. Implement Droplet/ Instance Level Firewall
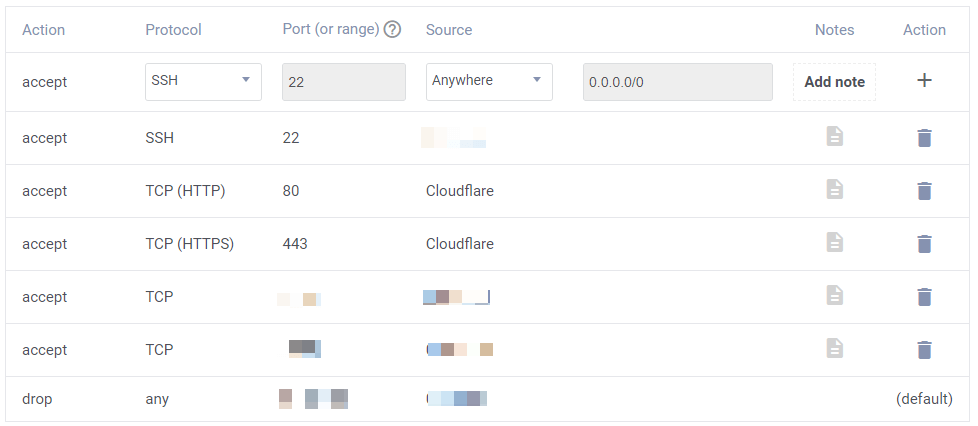
Almost all vendors provide a droplet-level firewall for Digital Ocean, Vultr, or Linode. We must implement that. That is your first level of security to protect the server. It is the first tollgate for any hacker.
Here is what the Vultr firewall looks like. Please make sure that you are allowing all the essential ports that you need, such as the SSH port, HTTP port, and HTTPS port.
6. Install CSF (ConfigServer Security and Firewall)
CSF is by far the best firewall for Linux. Though it is a little complicated to implement, your server will be much safer once you do it.
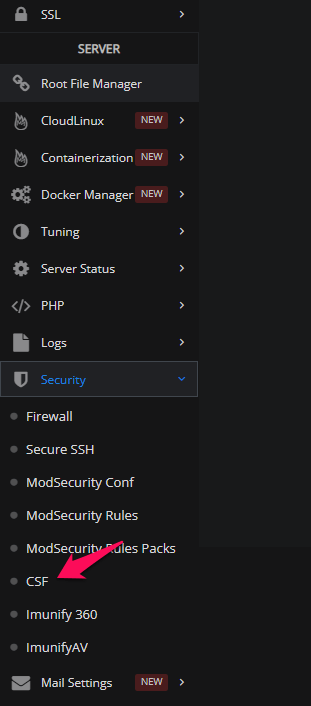
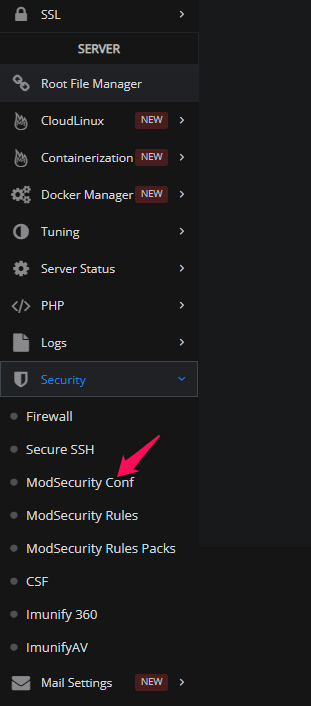
The best way to install CSF is by using control panels. I suggest you use Cyber Panel, as it has options to install CSF with one click. To install CSF in the Cyber Panel, go to your Cyber Panel dashboard and find the CSF option on the left side.
7. Install ModSecurity
ModSecurity is most commonly deployed to provide protections against generic classes of vulnerabilities using the OWASP ModSecurity Core Rule Set (CRS)
You can install ModSecurity using Cyber Panel very quickly.
8. Secure Control Panel
Here, we are taking the Cyber Panel example as it is one of the best free control panels available for servers.
Please ensure that you use the Cyberpanel image when you create a droplet or instances. This will prevent you from having to install Cyber Panel separately.
If not, you can run the following command to install the Cyber Panel
sudo su - -c "sh <(curl https://cyberpanel.net/install.sh || wget -O - https://cyberpanel.net/install.sh)"To get the root password, you need to run the following command. The default user name is “Admin,” which you need to change later to protect the cyber panel
sudo cat /root/.litespeed_passwordWhen you install Cyber Panel, several prompts could prompt you to answer many questions. All questions are self-explanatory.
Change Cyber Panel Port
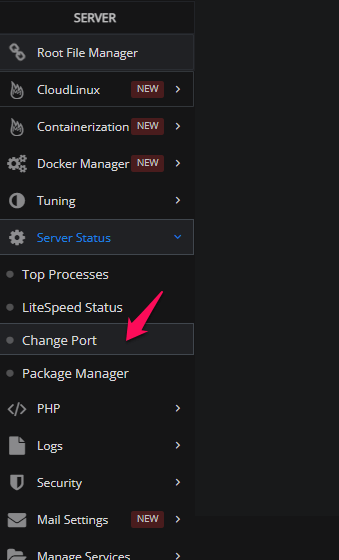
The Cyber Panel opens on port 8090 by default, but you must change it to something else to protect your server.
To do that, go to Cyber Panel Dashboard->Server Status->Change port
9. Use A CDN
Using a CDN adds a second layer of security to your Linux server. The CDN will mask your IP address, keeping it from being exposed to the world.
You will also benefit from a CDN-level firewall that will stop hackers from touching your server. If you use a CDN, here is the roadmap that hackers must follow before they can damage your server.
CDN Firewall-> Droplet Firewall-> Operating System Firewall-> Application Firewall.
It is tough to break this kind of strong firewall chain. So, it is almost assured that your Linux server will be secured if you follow the steps I mentioned in this article.
It is preferable to use Cloudflare CDN as it is one of the best and fastest CDNs. For images, you can use Bunny CDN.
Conclusion: Secure Linux Server
People were scared of using unmanaged VPSs due to security concerns. However, it is not very difficult to secure a VPS on your own.
The steps mentioned in this article are reasonable enough to protect your server. The internet is flooded with articles about secure Linux servers.
Why pay more for managed hosting when you can do everything independently and better control your server?
If you have any questions, you are always welcome to write them down in the comment section, and I will be happy to help.