Images account for about 25% of a web page’s total size. Other files like Javascript and CSS also contribute to the size, but images are a real pain for any website owner.
We live in an era where your online business growth depends on your website speed. If your site takes more than 3 seconds to load, you can expect to lose more than 50% of your website traffic.
The irony is that a website without enough images does not make sense to Google. So, the ultimate solution is to use images on the website, but on the other hand, optimize those images so that they do not affect your website’s speed.
But how do you do that?
You can optimize images manually (like using Photoshop) or using a plugin like Imagify. We assume that you are using the WordPress CMS.
This article is about the Imagify review. We will discuss the different key features of the Imagify plugin and determine whether it is the right image optimization plugin for your WordPress website.
So, let’s dive in.
What Is Image Optimization?
Images carry a lot of information, such as the camera models used, the location where they were taken, shutter speed, exposure, ISO, and many others. These are called EXIF data.
When you use an image on your website, you may not need your images to carry such junk information unless you are running a photography business website.
Images without EXIF data make a lot of sense for any general website. On top of that, you can always reduce or optimize the pixels of images without affecting the image quality.
The whole process of removing the EXIF data and optimizing the pixels of images is called Image Optimization.
Why Is Image Optimization Required?
Image optimization is a must if you are using a WordPress blog or website. By default, WordPress does not optimize images.
So, you need to optimize images if you want to use them on any WordPress website. This will ensure that your pictures do not hamper your website’s speed.
As I said before, you can always use Photoshop or similar software to optimize images offline. But that is not a perfect solution, as we want everything to be in Auto-Pilot mode.
That is why an image optimization plugin is the best bet. Install the plugin, set the settings, and relax. All your images will be optimized automatically before they are shown on your website.
When we talk about WordPress Image Optimization plugins, there are many players like EWWW, ShortPixel, WPCompress, etc. However, one name that is often ignored is Imagify. No worries, we will expose Imagify in this article.
Table of Contents
What Is Imagify?
Imagify is an image optimization plugin for WordPress developed by the same team that developed WP Rocket, one of the best cache plugins for WordPress.
Imagify can optimize images while you upload them, or you can optimize images after uploading them using the “Bulk Optimization” opinion.

Imagify can also convert images to newer image formats like WebP and deliver the same on the front end. All these happen on autopilot at the back of your website. This means you just set the plugin once, and the plugin will do its jobs thereafter.
Currently, Imagify supports optimizing image formats like JPG, PNG, PDF, and GIF.
How Does Imagify Work?
Many of you may think that when a plugin does so much work, it must stress your server. But the fact is, Imagify does not put any stress on your server at all. Each and every step is done on the Imagify server.
When you upload an image, the Imagify server uploads the same to its own server (Using API) and optimizes it. After optimization, the Imagify server saves the optimized files to your server, which is shown to your visitor.
The Imagify server does not keep your uploaded images on for more than one hour. That ensures that your data is protected.
Imagify also keeps the original unoptimized version of the image in a separate folder on your server. You can always go back to the original version.
You can choose to keep the original version or not. Imagify has an option not to save original images to save disk space.
Imagify can optimize images even if they were uploaded before you installed the plugin. Just run a bulk optimization, and Imagify will optimize all your old images, too.
Types Of Compression In Imagify
Imagify supports two types of image compression algorithms.
- Smart Compression
- Lossless Compression
Smart Compression
Smart compression is the default compression type in Imagify. Whether it’s lossless or lossy is unknown, as Imagify decides based on the image type without hampering the picture quality.
Lossless Compression
You may choose this option if you have a website where you sell pictures or a photography blog.
Lossless compression does not yield many benefits, as the compression ratio is very low. Images will be compressed, but you won’t see any drastic size difference.
Key Features Of Imagify
Here are the key features of Imagify that make it the best choice for image optimization in WordPress.
Supports Optimization Of Multiple Image Formats
Imagify supports the optimization of JPG, PNG, PDF, and GIF, which basically Means It supports most of the popular image formats.
Just upload any image in any of the above formats, and Imagify will optimize it instantly before it goes live.
WebP Delivery
WebP is the latest format. It is lightweight and does not cause much pixel distortion. Most modern browsers support WebP format images.
With Imagify, you can convert images to WebP format and show them on your website. There is no need for manual conversion, as Imagify will automatically do that on the back end.
Resize Images On The Fly
Your website will be viewed on multiple screen sizes, such as a computer, a smartphone, a tablet, or a TV. Right? For every screen size, Imagify will automatically resize images to suit the resolution.
For example, you may have a 2000X2000 pixel image that looks good on a desktop but not a smartphone. In that case, Imagify resizes the image so that it fits your smartphone screen.
No Stress On Your Server
Imagify works on a SaaS business model. That means all the optimizations are done on the Imagify server without bothering your web server.
Since everything is done on the Imagify server, your web server will not experience additional stress and will remain as fast as it used to be.
Intuitive Interface
Forget about those plugins with cluttered interfaces and you don’t know what options to use.
Imagify has a straightforward and intuitive interface. All options are easily available, and the navigation is well laid out. Even a newbie can set Imagify to get the best out of it.
How To Use Imagify: Imagify Best Settings
Here are the steps to install and configure Imagify and get the most out of it.
1. Install The Imagify Plugin
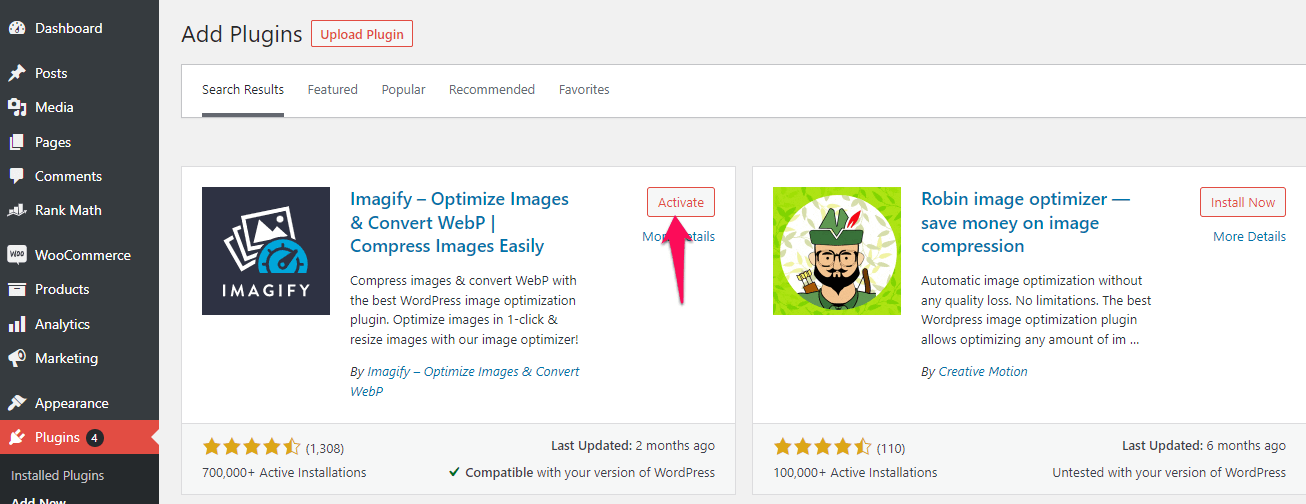
We all know how to install a plugin in WordPress, right? If not, go to the WordPress Dashboard-> Plugins-> Add New-> Search for Imagify.

Install the Imagify plugin by clicking on “Activate.“
2. Get Your API Key And Connect Your Account
When you install the plugin, you will be prompted to create an account and obtain your API key. Obtaining the API key is essential as this is the only interface through which Imagfy can optimize your images.
Here is what the prompt will look like.

When you click ” Sign Up,” you will be asked for your email address. Enter your email and then click on “Sign Up.”
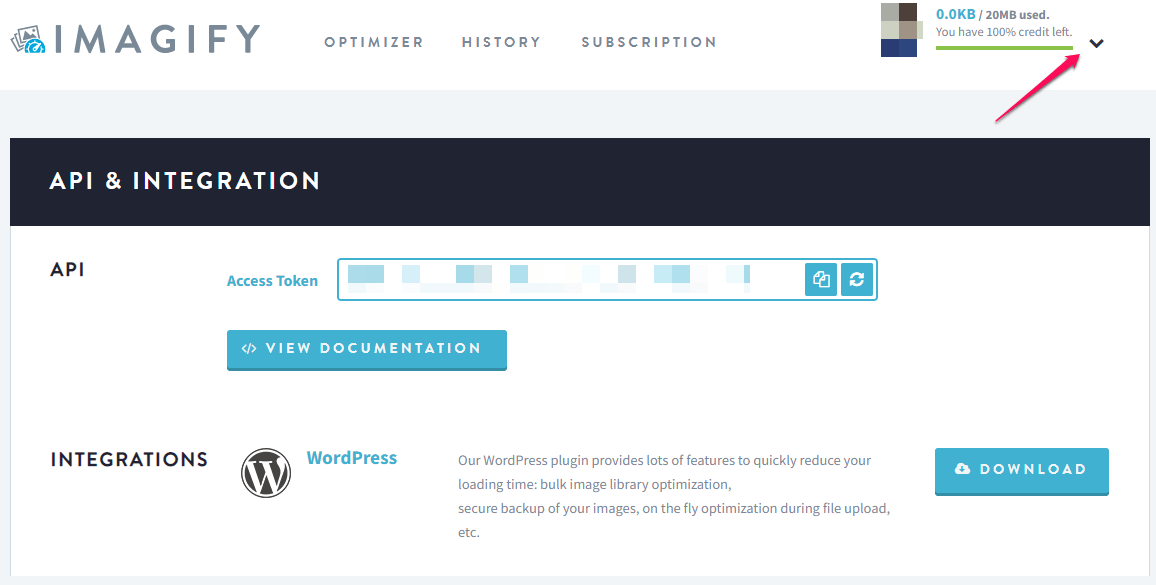
Once you sign up and log into your Imagify account, you can go to the profile section and click “API-Integration” to get the API Key shown below.

Copy the Access Token and enter it into the API key section. If the API key is valid, you will be able to access the setting.
3. Modify The Default Setting
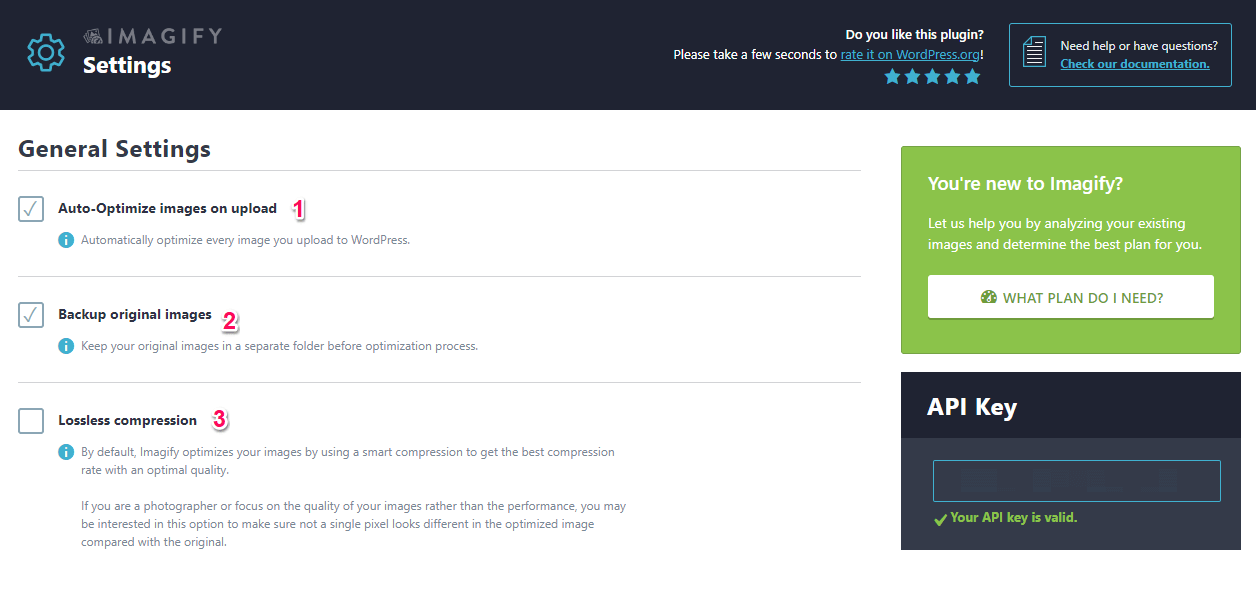
Imagify has a fairly simple setting page. You can access it by going to the WordPress Dashboard-> Settings -> Imagify.
General Setting

(1) Auto-Optimize Images On Upload: Please make sure that you check this option, as it will optimize all your images when you upload. This will ensure that the plugin is working in auto-pilot mode.
(2) Backup Original Images: You can keep a copy of the original unoptimized version images on your server. However, that will consume more space. The choice is yours.
I would suggest keeping this option checked just in case you need the original image in the future. if you are low on server space, you can uncheck this option.
(3) Lossless Compression: By default, Imagify does smart compression. Whether it’s lossy or lossless is unknown, but Imagify offers the best compression result when you use the smart compression ( Default option).
You can check this option if you want to choose Lossless compression. However, you may not notice any considerable change in the optimized image.
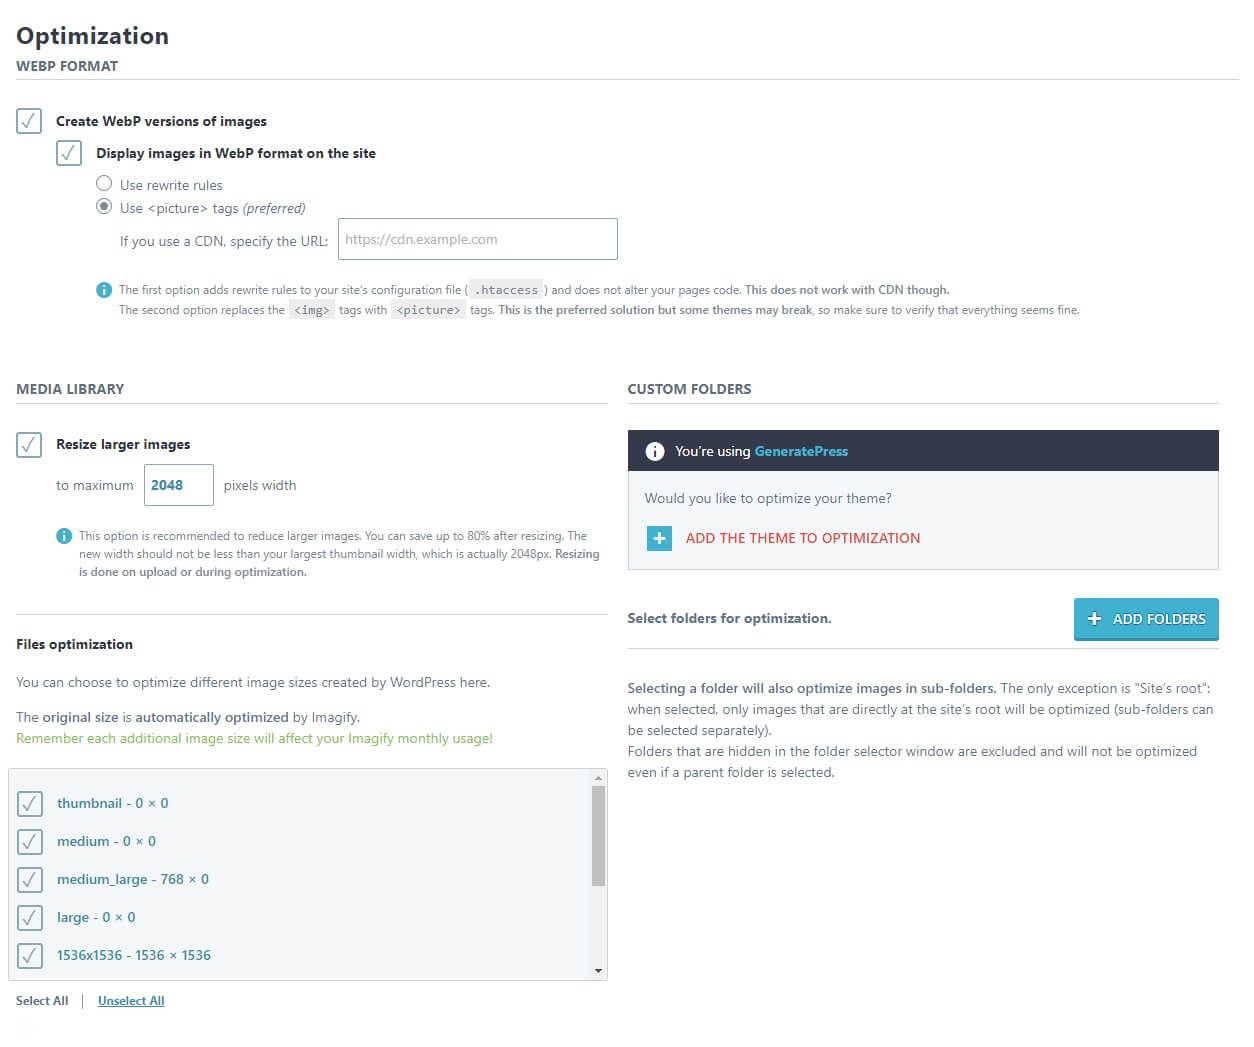
Optimization Setting

Create WebP Version Of Images: This option will create a WebP format image of your optimized image. The conversion happens at the Imagify server and is then pushed to your server.
Display Images In WebP Format On This Site: You can check this option if you want to show the WebP version of an image on your site. This is essential as it will improve your website speed.
Resize Images: If you want your images resized while uploading, check this option. You can also set the pixels to which the images should be resized.
Select Folder For Optimization: This is called bulk optimization. You can select the folders where you have uploaded images before, and Imagify will optimize the images available in these folders.
That’s it. Your Imagify plugin is all set and ready to optimize.
Performance And Test Results
We tested Imagify with one sample image and shared the outcome below. You will notice that Imagify did a good job in smart compression, but the WebP version is definitely the best.
The Original Image

The Optimized Image ( Smart Optimization + WebP)
The optimized image reduced the image size by almost 50%, and there was no noticeable pixel distortion. So, Imagify did a commendable job here.

Imagify Pricing
Imagify
Imagify offers a free plan that allows you to optimize images up to 20 MB per month. To optimize images beyond that limit, you must purchase a plan. The plan details are shown below.
Please note that the Infinite plan has a fair usage policy. So, although on paper, you can optimize unlimited images, you may not be able to do that in reality.
Unlimited Optimization
500 MB Per Month
$5 per additional GB
Imagify Positives And Negatives
Positives
- It has a free plan
- Very nice interface
- WebP delivery
- Bulk optimization
- Optimize images while you upload.
Negatives
- No image CDN on offer
- The free plan does not make any sense
- The pricing is on the higher side
Conclusion: Imagify Review
Imagify is a great plugin—there’s no doubt about it. In fact, our test result shows decent image optimization performance. However, the real problem is the pricing and lack of CDN.
You can hook up Imagify to RocketCDN, but you will have to pay for a subscription. That’s an extra burden, especially since the competition is offering image CDN for free.
If Imagify can work on these issues, its value proposition will be very competitive, making it easy for anyone to switch to Imagify.
So, do I recommend Imagify?
Yes, of course! Every product has positives and negatives, but Imagify is a perfect tool for optimizing images and making your website faster.
Frequently Asked Questions | Imagify Review
Is there a free plan available On Imagify?
Yes, Imagify has a free plan that allows you to optimize up to 20MB of images per month, which is roughly 200 images per month.
What Image Formats Does Imagify Support?
Imagify supports optimizing JPG, PNG, PDF, and GIF images.
Will Imagify Slow Down My Website?
No, not at all. Imagify processes the image on its own server. So it will not slow down your website
What are the different image compression types that Imagify Supports?
Imagify supports the following image compression types.
Smart Compression ( Default)
Lossless Compression
