If you have been holding a start-up or are already in the business for many years, having an e-commerce store opens the door to a large customer base.
Due to different complexities, it was tough to build an e-commerce store before. With the introduction of WordPress and other open-source platforms, things got easier than before.
With the evolution of AI, it is now like a piece of pie to go online and build an e-commerce store.
This article will be about How to build an Ecommerce store using WordPress and CloudWays with the help of different AI tools.
Excited?
Let’s get into it.
Table of Contents
Overview Of Ecommerce And Its Growing Importance
E-commerce is the engine of your online business. Traditional businesses concentrate on the local customers, whereas ecommerce caters to global customers.
E-commerce platforms power the back end of your tech stack, and they contain the necessary tools to help you build and run your online store, such as payment processing, marketing tools, inventory management, and more.
As per the latest report, there are around 26 million e-commerce stores live, and the YOY growth rate is around 3.83%
You may host your e-commerce store on any SaaS platform like Shopify or a hosting platform like CloudWays.
Benefits of Using WordPress and Cloudways for E-commerce Stores
WordPress is an open-source platform with many themes and plugins that allow you to customize it however you want. By default, WordPress does not offer an e-commerce module.
It has a plugin called WooCommerce that brings e-commerce functionality to WordPress. Woocommerce has nearly 66% of the e-commerce platform market share as of 2024.
The benefit of using WooCommerce is that you can achieve any functionality using plugins or customize the code to suit your requirements.
Cloucways is one of the pioneers in managed hosting and a perfect companion for your e-commerce business. With its state of the infrastructure, Cloudways is the best web hosting service for any e-commerce store.
The Role Of AI In Modern E-commerce
Artificial Intelligence (AI) has become integral to modern eCommerce, revolutionizing how businesses operate and interact with customers.
AI refers to machines’ simulation of human intelligence processes, including learning, reasoning, and self-correction. In e-commerce, AI analyses data, makes personalised recommendations, automates tasks, and enhances customer service.
Its role in modern e-commerce is crucial for businesses looking to stay competitive in the digital marketplace.
Setting Up WordPress On Cloudways
Why Choose Cloudways for Hosting WordPress?
Cloudways offers a plethora of advanced features that are essential for a WordPress website or blog. If you plan to run an e-commerce store, then it becomes necessary to choose a web host that is secure, fast, and has an excellent technical support team.
Fortunately, Cloudways excels in all these areas, which is why it is the best choice for hosting an e-commerce store. If you want to know more about what Cloudways offers, I suggest you read the Cloudways Review article.
How To Sign Up For Cloudways
First thing first. The first thing you need to do is buy a hosting plan. For that, you can consider clicking this link, which will take you to the Cloudways Autonomous home page.
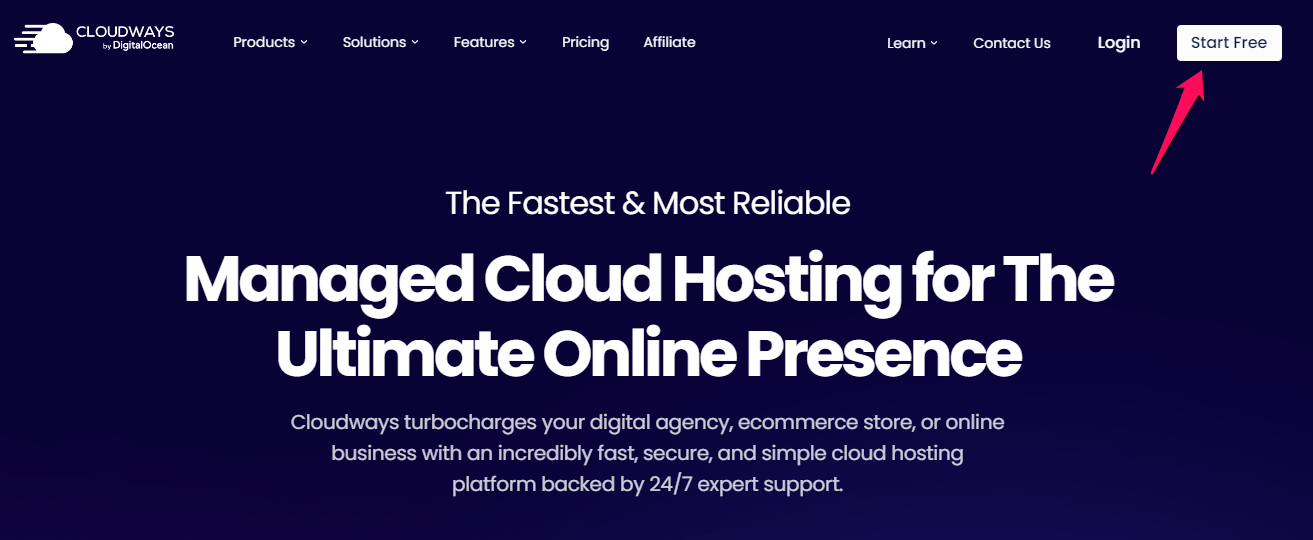
Click on ” Start Free” to access the signup page.
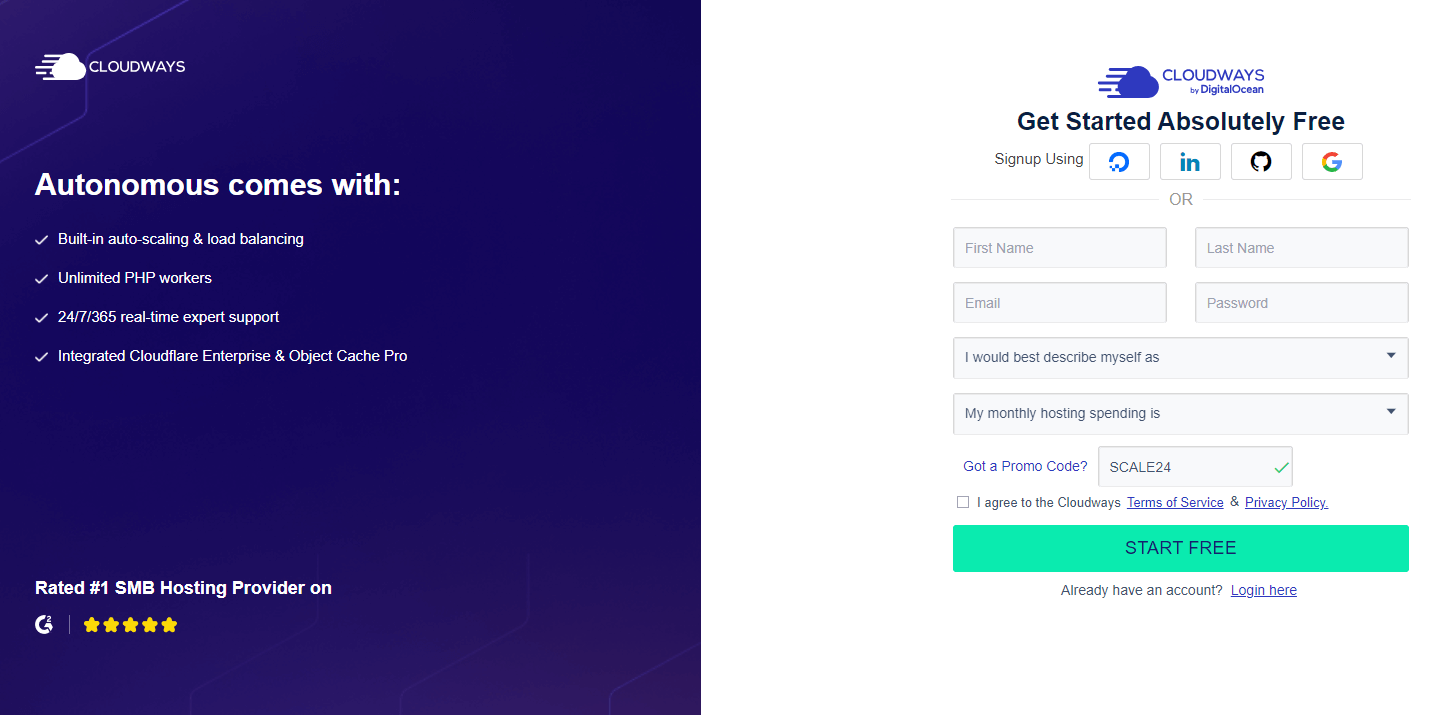
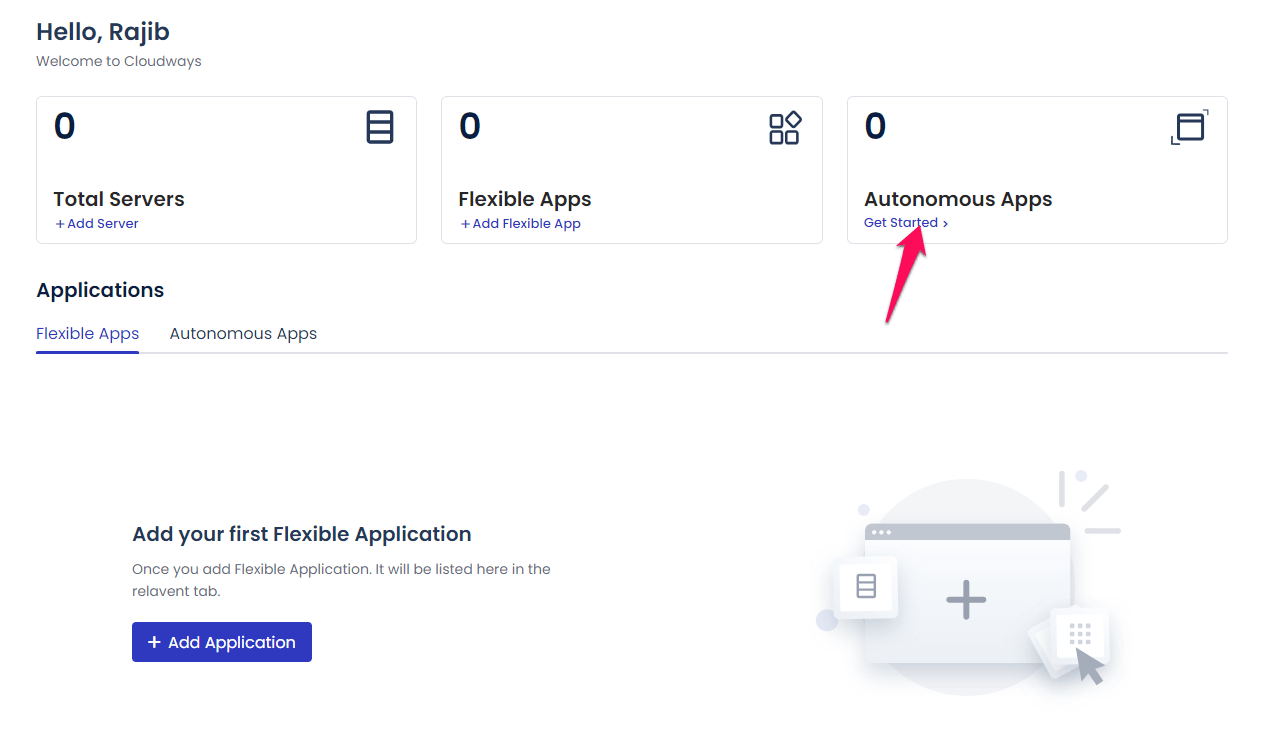
Once you sign up, the next thing to do is to deploy your server. Select Autonomous Apps from the list and click on “Get Started.“
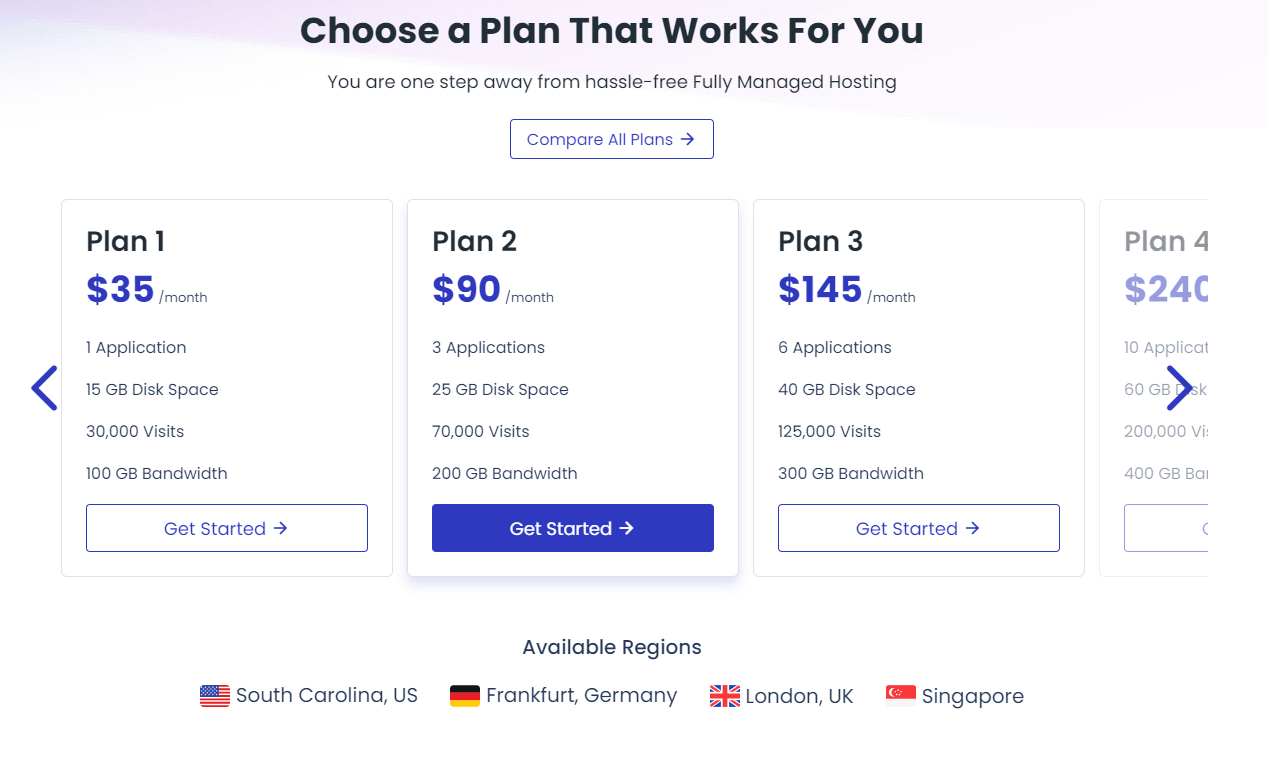
Selecting The Right Hosting Plan
Choose a plan based on your requirements and click ” Get Started. “
Setting Up The Server: Step By Step Guide
Once you choose a plan, you will be presented with the application setup window. There, you need to add the application’s name, choose the region, and select the type of application.
Once done, click on ” Add Application “. It will take some time to install the application.
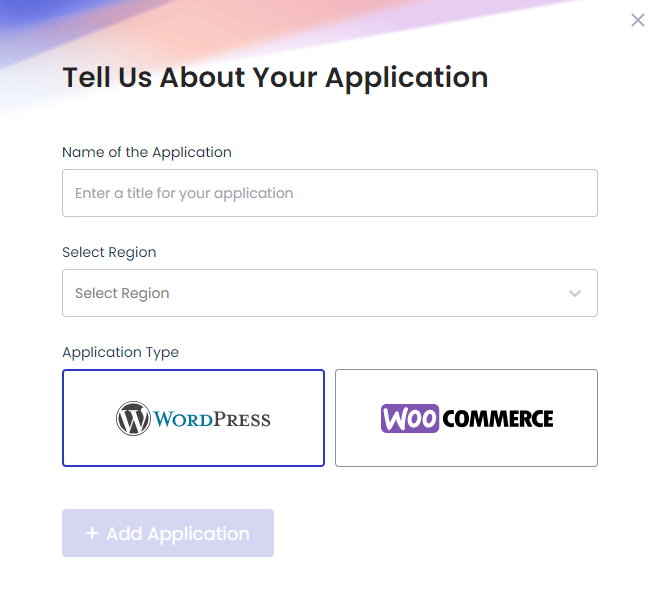
Once the application is installed, it will appear under the application list.

The window below shows the interface you will be presented with once you click on the application. All the options are properly laid out so that it’s easy for you to find different settings.
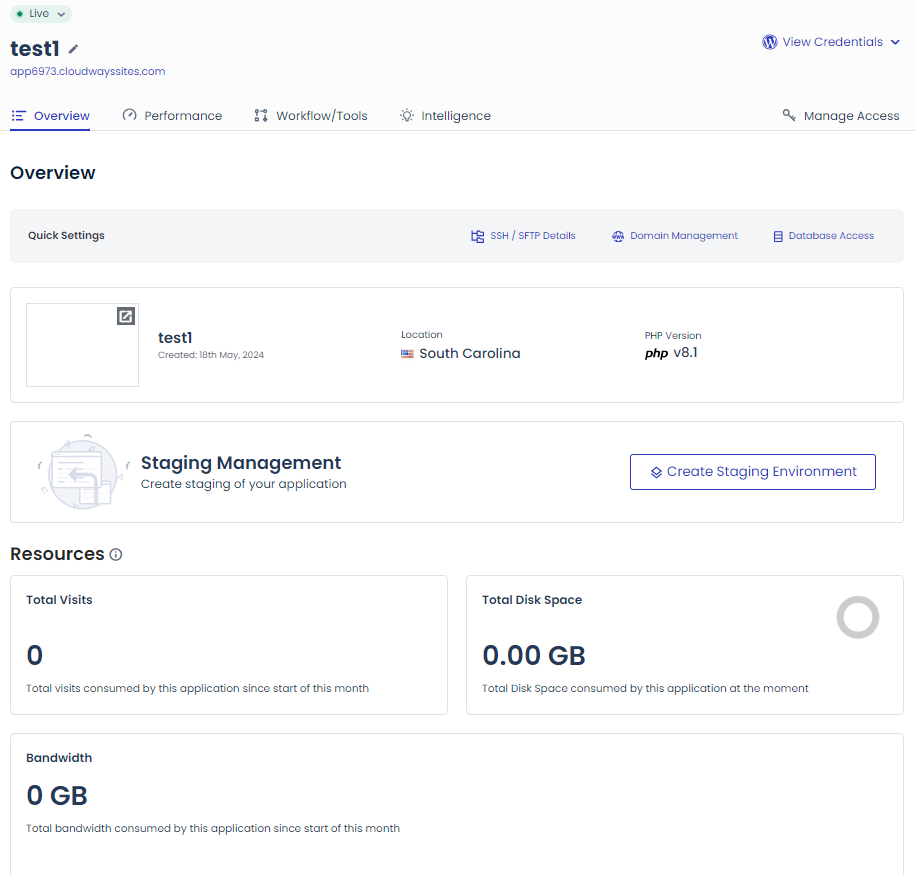
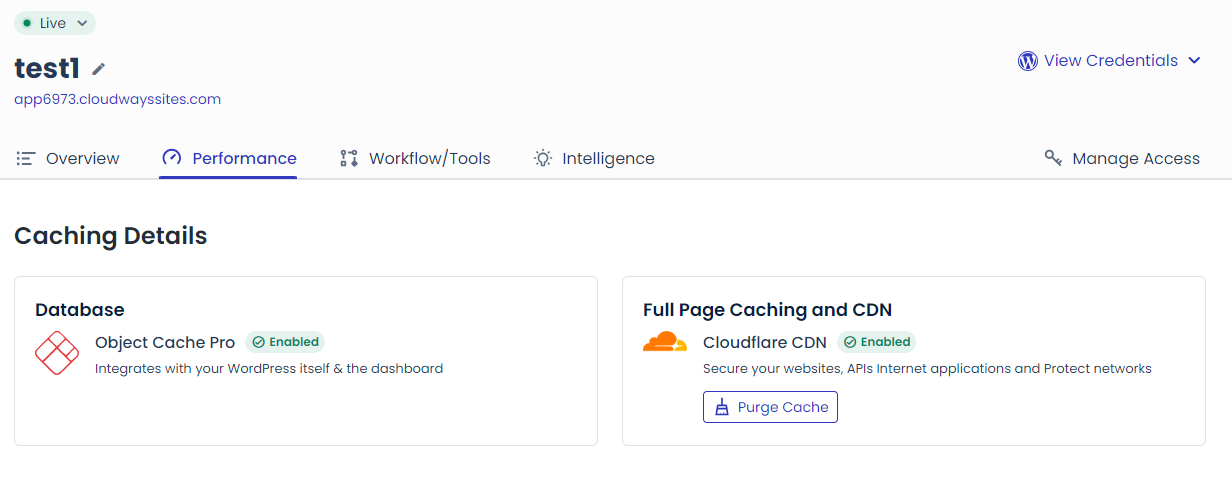
Under the “Performance” tab, you will notice the Edge CDN and Object Cache Pro options. Both are enabled by default, and you can not set anything. Everything is managed by the CloudWays team.
By default, CloudWays will create a subdomain for your application. For live sites, you need to add your domain under domain management.
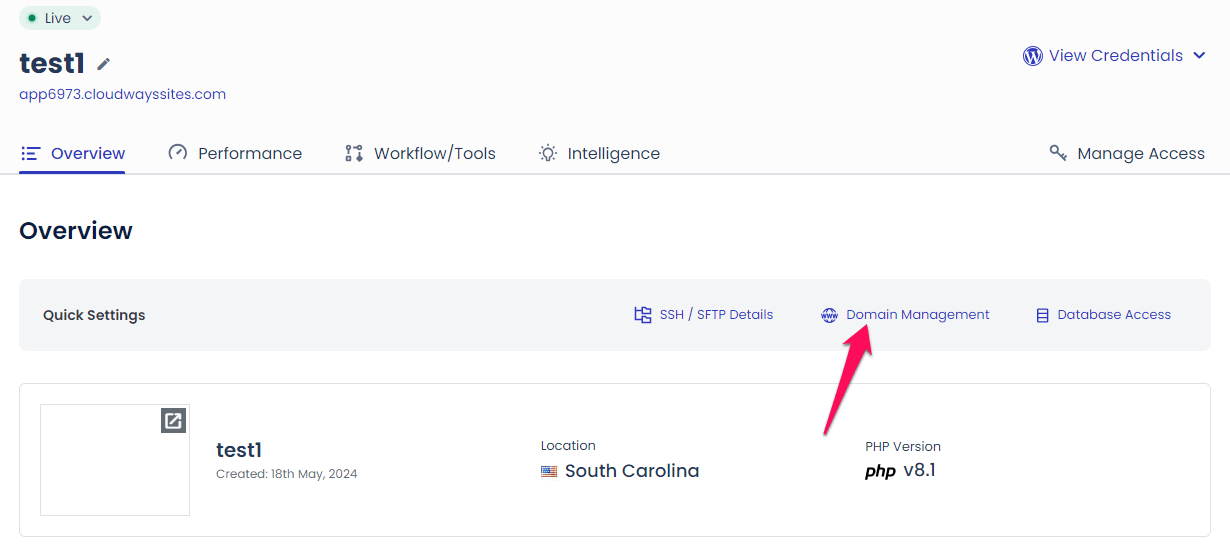
You need to add the domain name here. All the CloudFlare features will automatically be added to the domain once you add them.
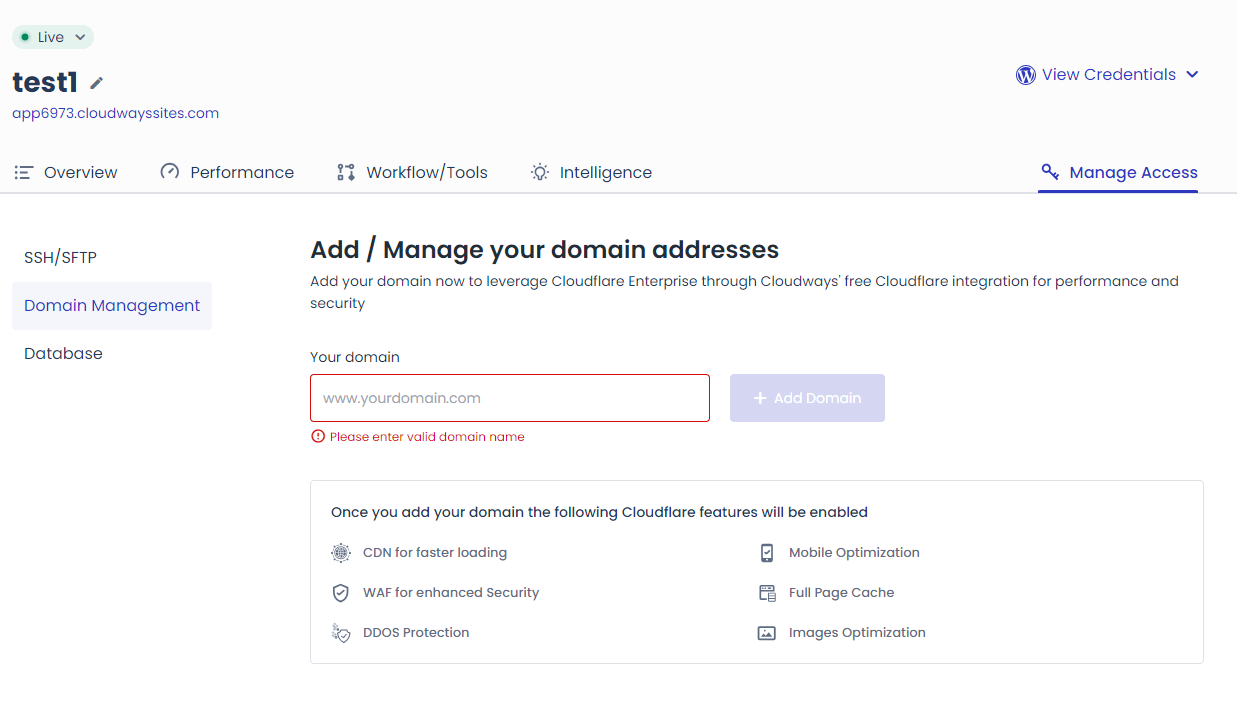
Once done, you can access your site using the domain name you have just added.
Choosing And Installing An E-commerce Plugin
WordPress, by default, does not offer any e-commerce functionality. You need to install an e-commerce plugin to activate the feature sets.
Although many plugins are available, WooCommerce is the best plugin developed and supported by the Automattic team, which also developed WordPress.
With over 66% e-commerce market share, it is among the most popular e-commerce platforms.
Installing and Activating WooCommerce
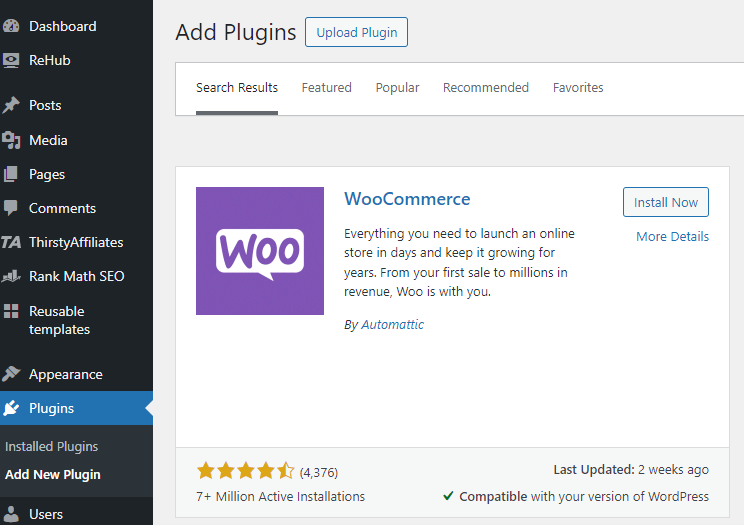
Installing Woocommerce is like installing any other plugin. All you need to do is navigate to Plugin-> Add New Plugin-> Search for WooCommerce-> Install
Initial Configuration Setting
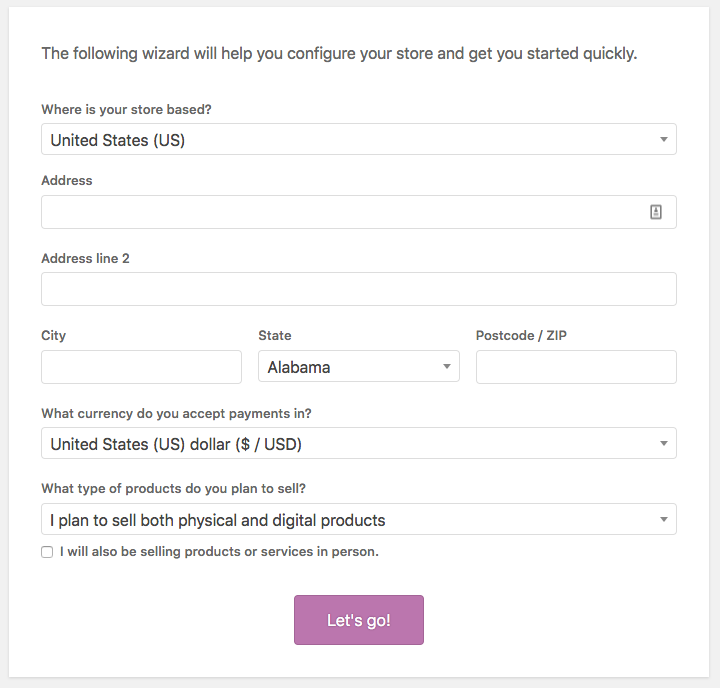
As soon as you install Woocommerce, you will be presented with the initial setup wizard that will take you through some essential and basic settings.
It will ask for the store location and address and the kind of product you want to sell.
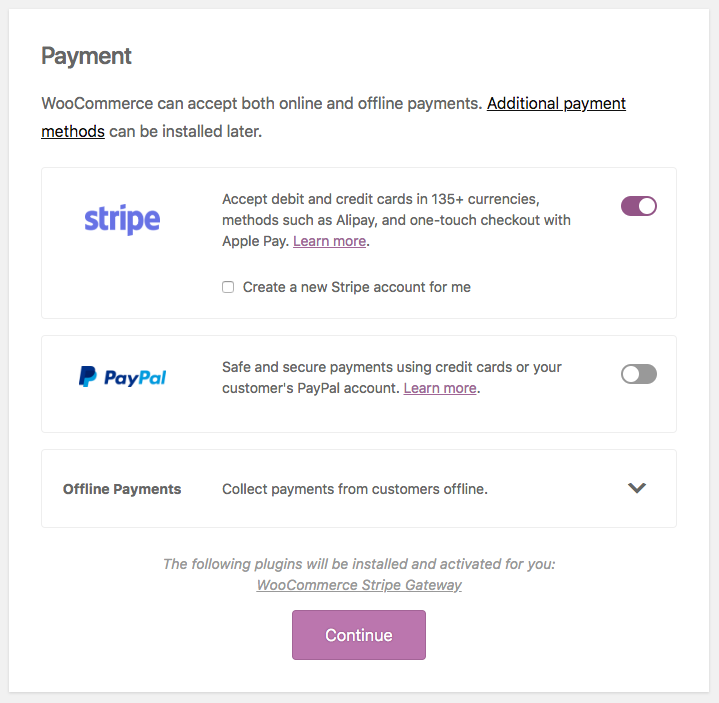
Based on the above selection, WooCommerce will present the payment gateway option. Don’t worry. You can change or add different payment gateways later.
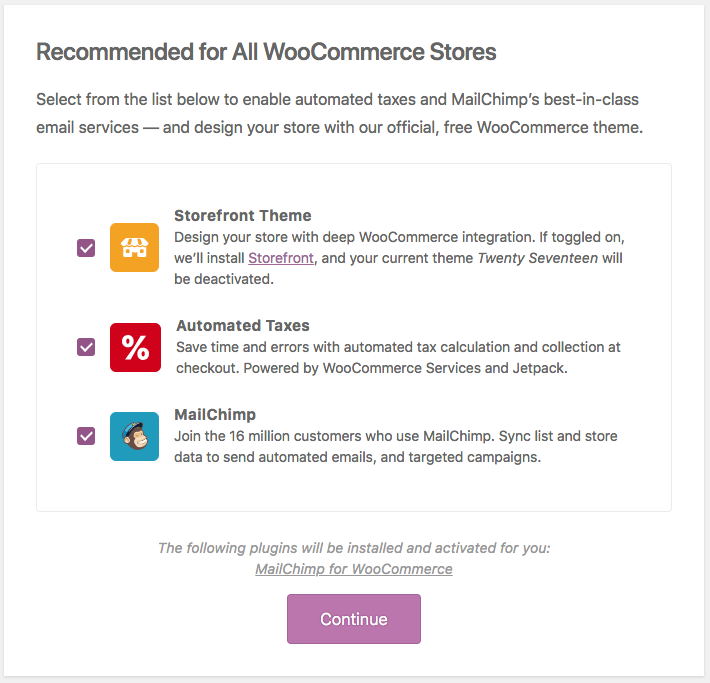
It will then ask for the recommended themes and plugins to install. You can skip this step or install the plugins required for your business.
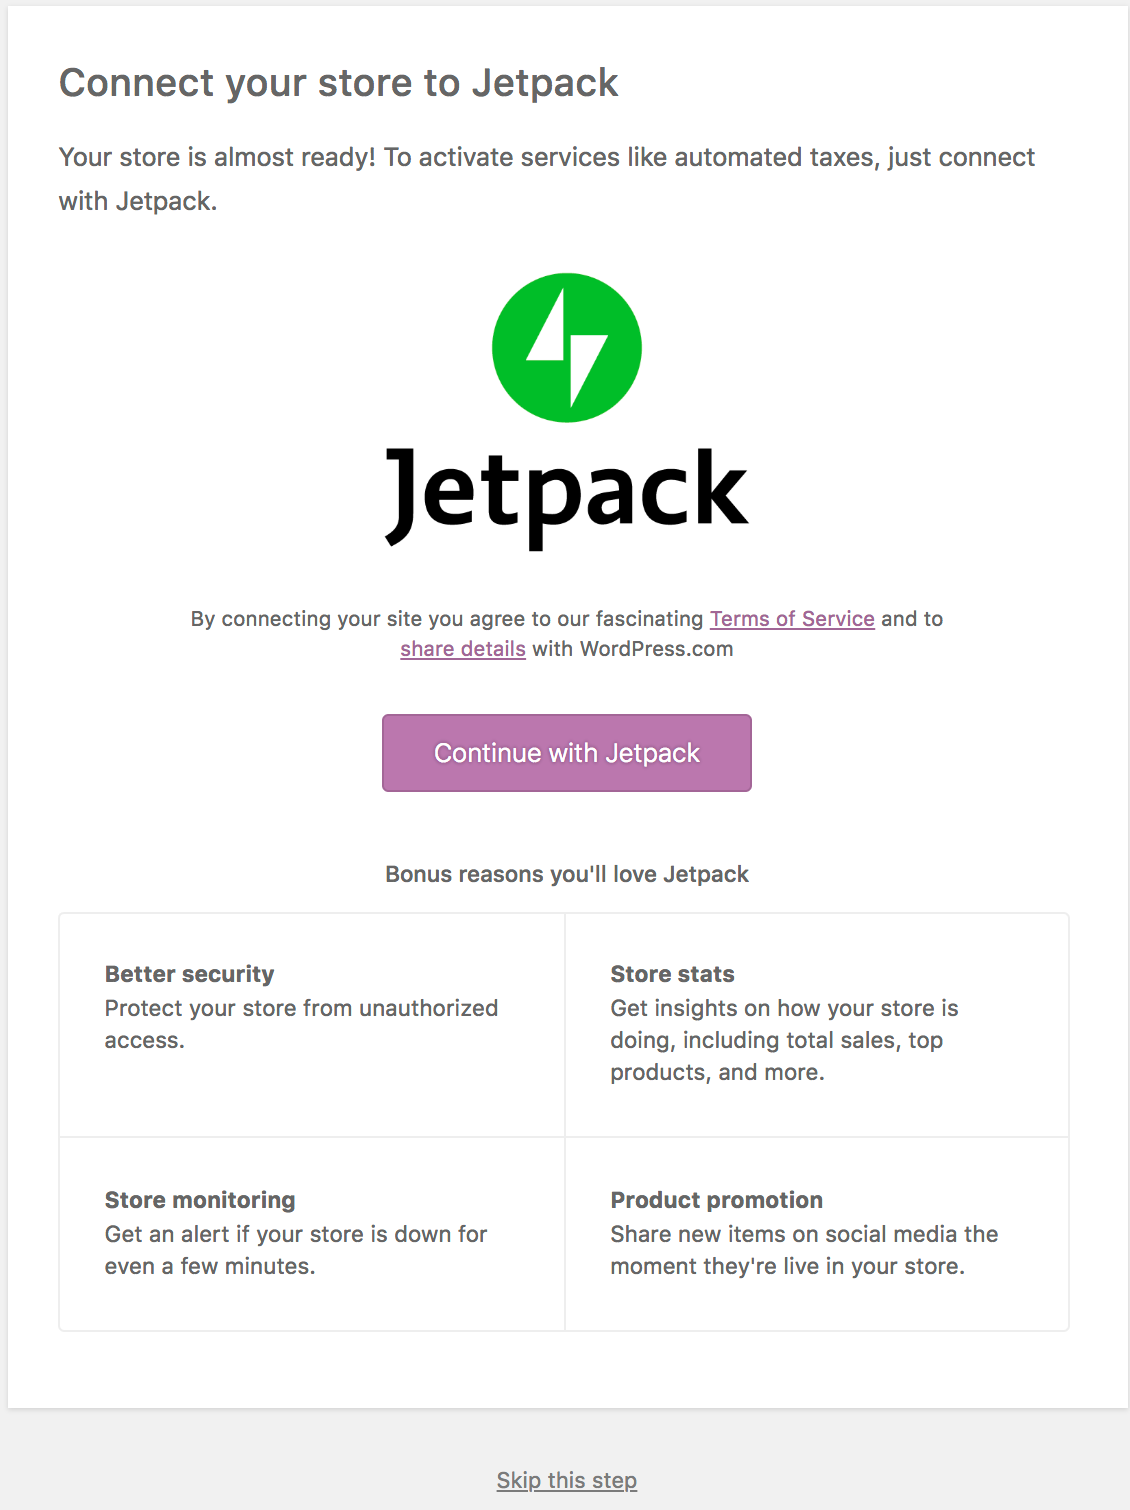
Finally, you will be asked to install Jetpack, which you can skip as there are many alternatives to Jetpack available on the market that offer better security and speed.
Designing Your WooCommerce Store
Choosing And Installing A WooCommerce Theme
There are many free and premium WooCommerce themes available in the market. Based on your business needs, you can choose the one that meets your requirements.
Some of the best Woocommerce themes are listed below.
- Storefront
- Rehub
- Astra ( With Pro Add On)
- GeneratePress
- Cadence
Best Practices for User-Friendly Design
Some key elements you must consider when choosing a user-friendly theme are listed below.
- Responsive design
- Clear and intuitive navigation
- Fast loading time
- Accessibility
- Optimized checkout process
Adding Product To Your Store
How to Create Product Listings
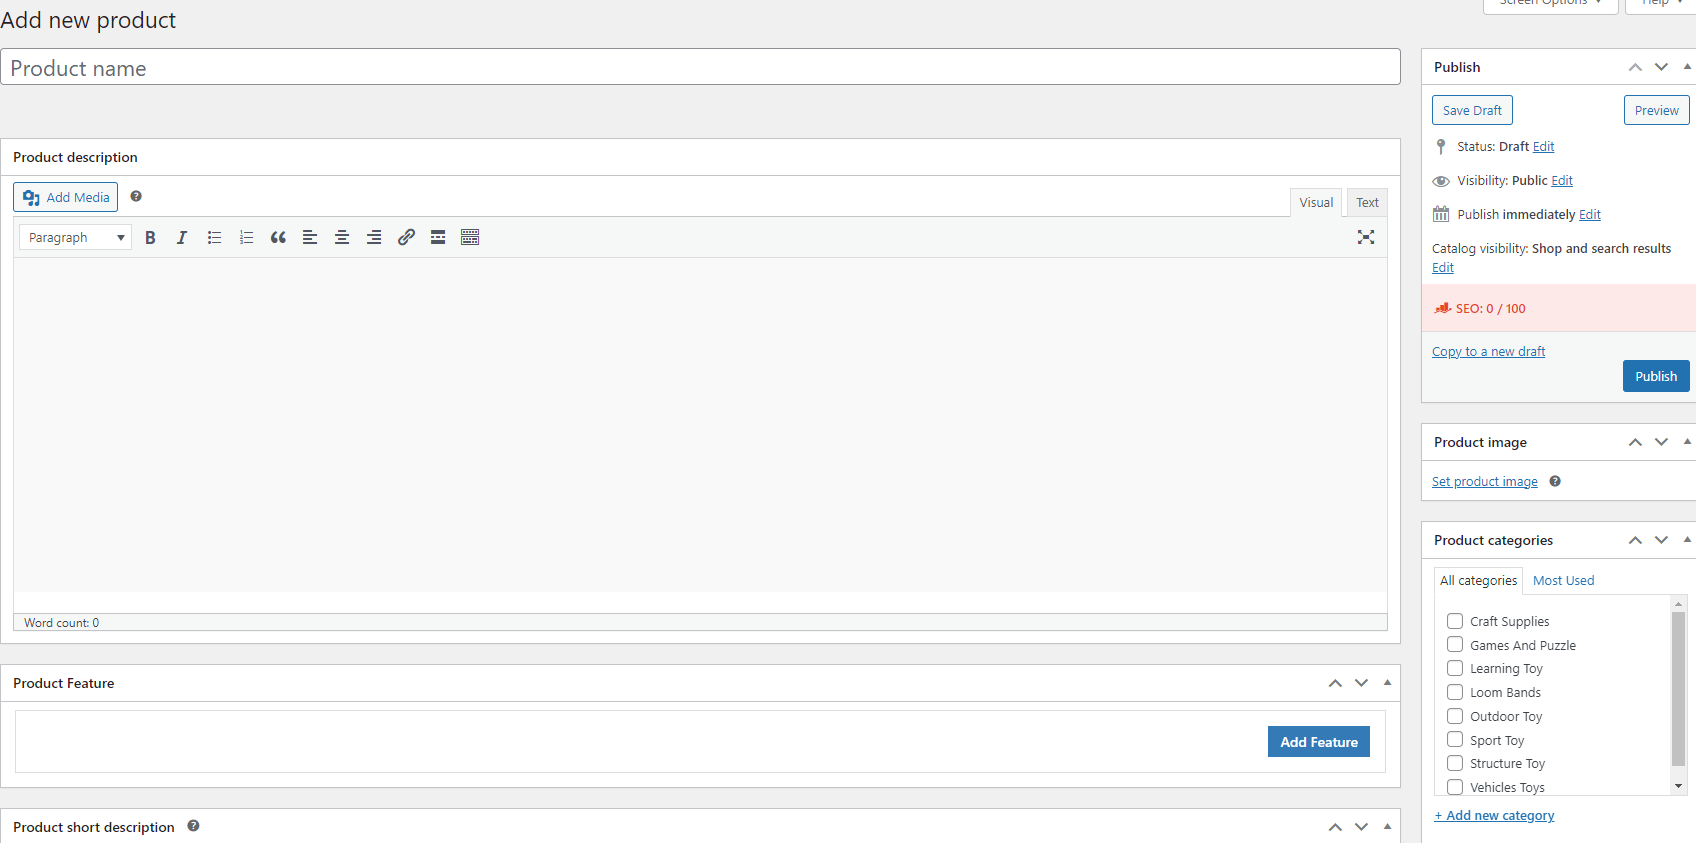
Adding a product to your WooCommerce store is very easy. With the intuitive interface, things get much easier than before.
All you need to do is go to Products -> Add New and follow the new product form as shown below.
Organizing Products with Categories and Tags
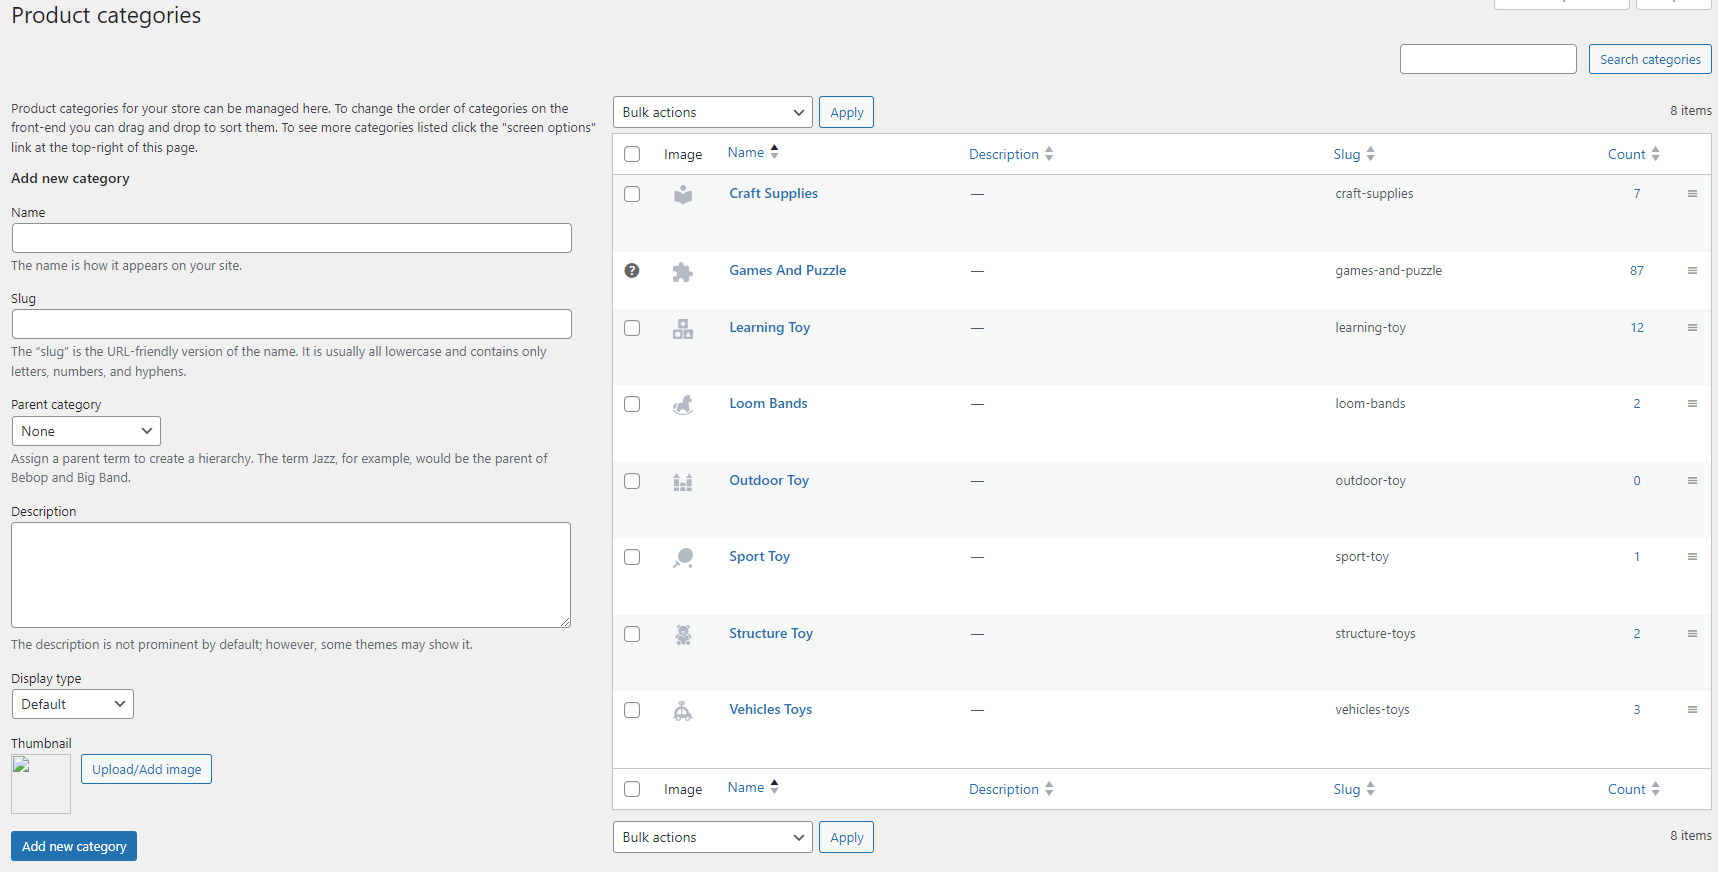
You will need to segregate your product into different categories to make it easier for customers to navigate various products.
You can also add product tags and filter the listing based on that.
To add categories, navigate to Products-> Categories-> Add New Category.
Optimizing Product Pages for SEO
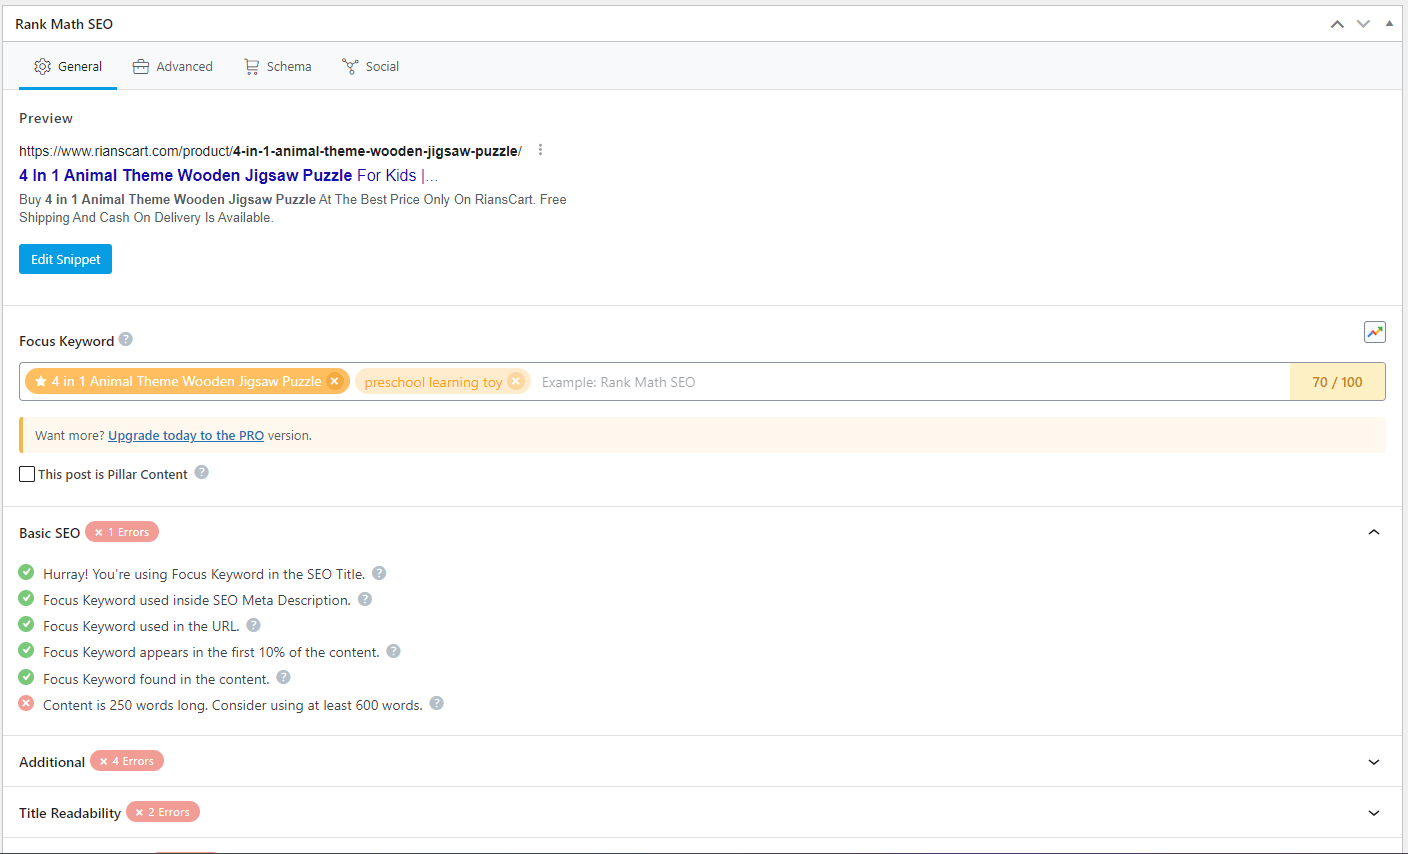
You can use Rank Math or any other SEO plugin to optimize the product pages for SEO, including product metadata, meta title, meta description, etc. You also need to follow all the best SEO practices that you usually follow for posts.
Using AI for Product Description Generation
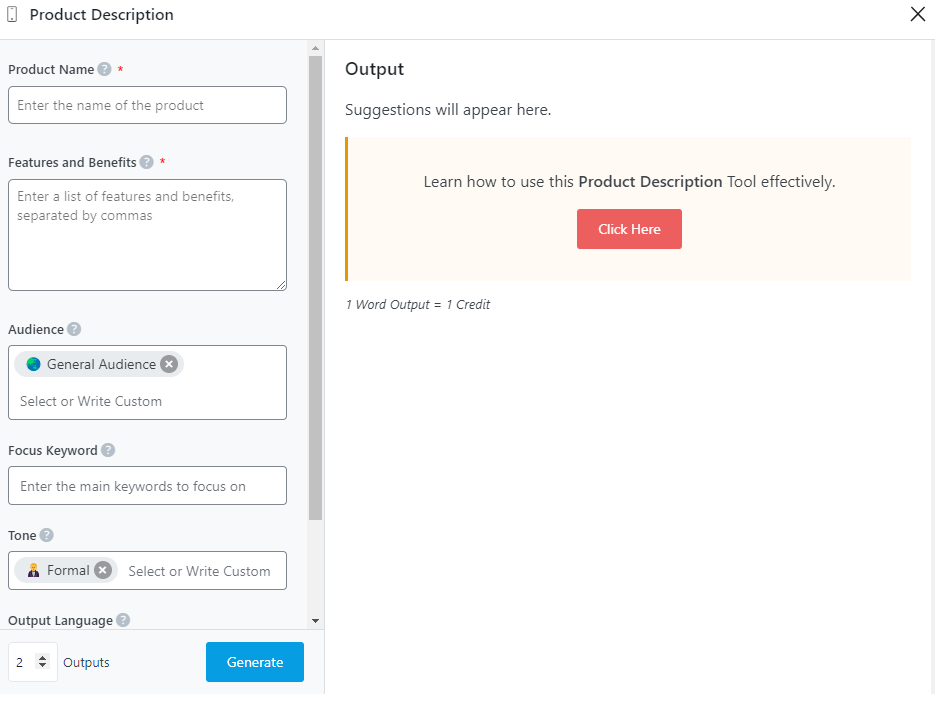
You can use the Rank Math Content AI module to generate AI-powered Product descriptions, as shown below. You need to provide the basic inputs to generate the AI-powered product description.
Setting Up Payment Gateways
Overview of Supported Payment Gateways
WooCommerce supports multiple payment gateways. Your financial organization may have its custom code to integrate with WooCoomerce. WooCommerce supports 90% of the payment gateways available in the market.
How to Configure Payment Options
To configure payment options, go to WooCommerce-> Settings-> Payments and add the necessary payment gateways.

Ensuring Secure Transaction
Most payment gateways offer robust authentication, enable encryption for all transactions, apply the principles of least privilege to user access, and keep software updated regularly.
Using AI For Fraud Detection
AI-powered fraud detection systems analyze real-time transaction data to identify suspicious patterns and prevent fraud.
These systems can detect anomalies and flag potentially fraudulent transactions, reducing the risk of financial losses for e-commerce businesses.
Configuring Shipping Options
Setting Up Shipping Zones and Rates
You can create different shipping zones and add different rates for that. To generate shipping zones, navigate to WooCommerce-> Shipping-> Add Zone.

Integrating Shipping Plugins and APIs
You can also integrate third-party plugins and APIs like Shiprocket to automate the order-managing process.
When you integrate Shiprocket, all your orders will show up in Shiprocket automatically for shipping. This reduces a lot of time spent fulfilling orders.
Managing Orders and Shipments
Order management can be done manually in Woocommerce or by using a shipping plugin or API to do the same automatically outside WooCommerce.
Both have positives and negatives, but automation reduces the processing time for many orders.
AI-Powered Shipping and Inventory Management Solutions
AI for Inventory Optimization
AI algorithms analyze historical sales data, market trends, and other relevant factors to optimize inventory levels.
This ensures e-commerce businesses have the right stock to meet customer demand while minimizing carrying costs.
Demand Forecasting with AI Algorithms
AI-powered demand forecasting models use advanced algorithms to predict future customer demand accurately.
This allows e-commerce businesses to make informed decisions about inventory replenishment and procurement, reducing the risk of stockouts and excess inventory.
Preventing Stockouts and Overstocking with AI
By leveraging AI for inventory management, e-commerce businesses can prevent stockouts and overstocking, improving customer satisfaction and reducing carrying costs.
AI helps businesses maintain optimal inventory levels, ensuring products are available when customers need them.
Enhancing Store Security with Cloudways
Importance of Website Security for Ecommerce
Security should be the utmost priority of any website, including a WooCommerce store. You may get a web hosting plan for a dollar,r but have you ever considered how they may compromise your website security?
When security is a concern, I highly recommend Cloudflare. Cloudways offers a bunch of advanced security features that not only provide security to your woocommerce store but also enhance customer trust.
Using Cloudways Built-In Security Features
The following features are built into Cloudway’s Offering
- The dedicated firewall at the server level
- SSL Certificate
- Regular security patching
- Two Factor Authentication
- Advanced DDoS protection [ When you use the Cloudflare Enterprise CDN]
- Web Application Firewall [ When you use the Cloudflare Enterprise CDN]
- Safeupdate for WordPress
You need to install the SSL certificate manually. You can also opt for Safeupdate which is an optional offering from Cloudways. The rest of everything is built into the server or offered by Cloudflare.
Optimizing Store Performance
Speed and Performance Optimization Tips
Here are some of the optimization tips for your website.
Use A Good Web Server
Many don’t even check the web server before choosing a hosting plan. That is a big mistake because a web server is the heart of your web hosting.
Apache is the default choice for almost all shared hosting and VPS. However, Apache is a very slow web server and is not recommended if you care for speed.
Instead, we can go for the LightSpeed server, if not at least go for the NGNIX.
Use A Cache Module
The cache module acts as a mediator between web browsers and web servers. Cache modules save static files so that whenever visitors request any web content, it is directly served by the cache module instead of fetching that from the main web server.
This helps in loading the website much faster than before. The two cache modules below are very popular.
- Varnish Cache
- NGNIX cache
Both varnish and NGINX cache modules can be installed on Apache and NGINX web servers. Your host will install a cache module for shared hosting. For VPS and Dedicated servers, you need to install the cache module.
Use A Reverse Proxy
A reverse proxy is an intermediate proxy server that handles all client requests as the main server.
Whenever a client request happens, the reverse proxy server serves the content without bothering the main server.
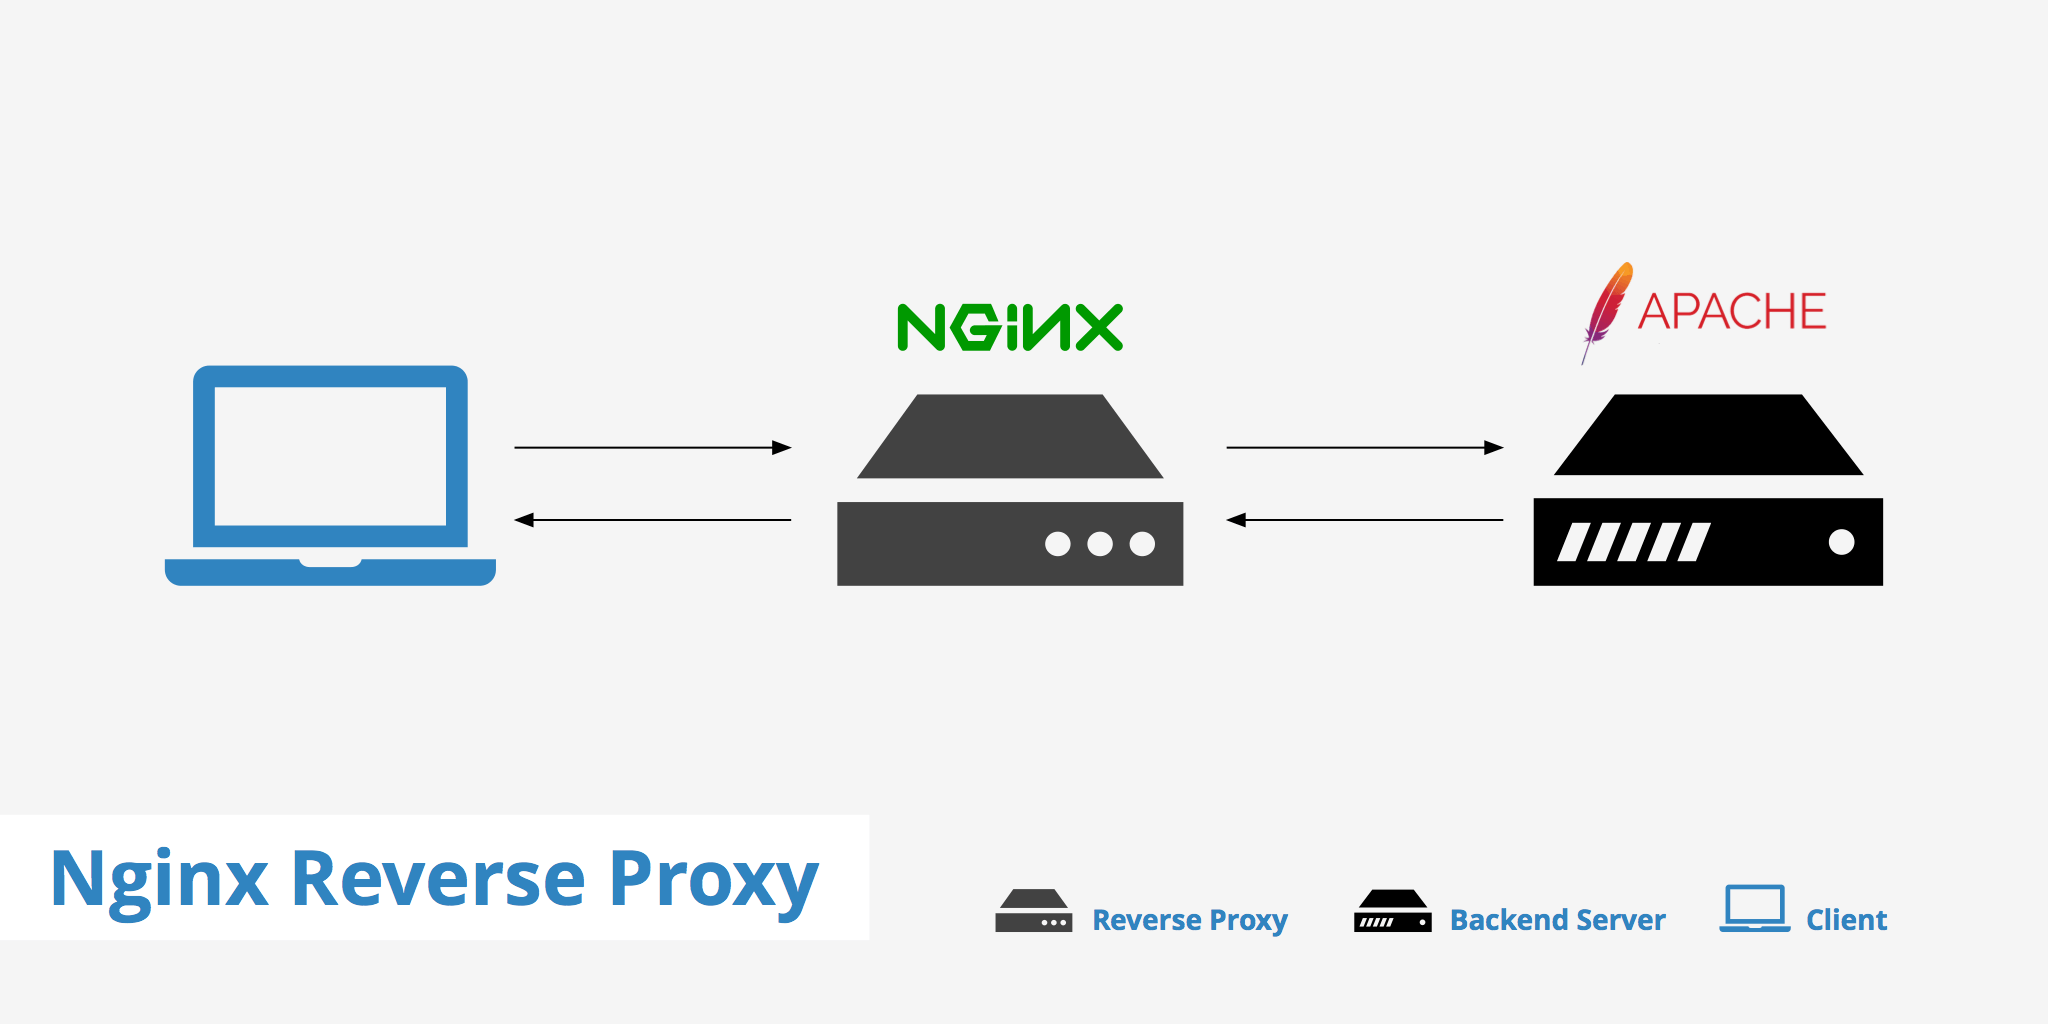
The main difference between the forward and reverse proxy is that, in the case of the forward proxy, the proxy needs to be there at the client level. But in the case of reverse proxy, it sits on the server level.
NGINX reverse proxy is very popular and can be installed on Apache and NGINX. So, for those looking for a reverse proxy module, NGINX reverse proxy is a very good option.
Enable GZIP compression
More than 90% of websites show content in a compressed format. If data is not compressed, it will take longer for a website to load, which is annoying for many visitors.
You can enable GZIP compression by using a WordPress plugin, but you can also change some settings at the server level.
To enable GZIP compression without any plugin, you can add the following code to your .htaccess file. Please make sure that you add this code after the existing derivatives.
Also, you must ensure that the mod_filter is active on your server. Otherwise, you will get an HTTP 500 error.
<IfModule mod_deflate.c>
  # Compress HTML, CSS, JavaScript, Text, XML and fonts
  AddOutputFilterByType DEFLATE application/javascript
  AddOutputFilterByType DEFLATE application/rss+xml
  AddOutputFilterByType DEFLATE application/vnd.ms-fontobject
  AddOutputFilterByType DEFLATE application/x-font
  AddOutputFilterByType DEFLATE application/x-font-opentype
  AddOutputFilterByType DEFLATE application/x-font-otf
  AddOutputFilterByType DEFLATE application/x-font-truetype
  AddOutputFilterByType DEFLATE application/x-font-ttf
  AddOutputFilterByType DEFLATE application/x-javascript
  AddOutputFilterByType DEFLATE application/xhtml+xml
  AddOutputFilterByType DEFLATE application/xml
  AddOutputFilterByType DEFLATE font/opentype
  AddOutputFilterByType DEFLATE font/otf
  AddOutputFilterByType DEFLATE font/ttf
  AddOutputFilterByType DEFLATE image/svg+xml
  AddOutputFilterByType DEFLATE image/x-icon
  AddOutputFilterByType DEFLATE text/css
  AddOutputFilterByType DEFLATE text/html
  AddOutputFilterByType DEFLATE text/javascript
  AddOutputFilterByType DEFLATE text/plain
  AddOutputFilterByType DEFLATE text/xml

  # Remove browser bugs (only needed for ancient browsers)
  BrowserMatch ^Mozilla/4 gzip-only-text/html
  BrowserMatch ^Mozilla/4\.0[678] no-gzip
  BrowserMatch \bMSIE !no-gzip !gzip-only-text/html
  Header append Vary User-Agent
</IfModule>
Optimize Images
If you are using Apache or NGINX, then you can use the Page Speed module to optimize images at the server level. However, you can always optimize images by using WordPress plugins.
Page speed modules compress images and thus improve website loading time. Ideally, it can reduce image size by up to 50% by removing no visible image information and applying high-efficiency compression methods.
It also supports offering new image formats like WEP. If you allow the page speed module to change your HTML and CSS code, then the image size will be reduced more, and your website will load faster.
You can read this article to learn more about optimising images in Apache
Use HTTP/ 2 Or HTTP/3 protocol.
HTTP/ 2 or HTTP version 2 protocol can load your website faster than HTTP/1. At present, only about 10 million websites use the HTTP/2 protocol.
However, these numbers are increasing, and if you want to increase your website loading speed, you should use the HTTP/2 protocol.
If you are using shared hosting, then you might see a straightforward setting to enable HTTP/2. You have to install the module manually in VPS or dedicated servers, depending on your server type.
You can also enable HTTP/2 in Cloudflare CDN without doing anything at the server level.
If you want to use HTTP/3 or Quic.cloud then you need to use Lite Speed server as they support HTTP/3 protocol.
Use SSL
SSL ( Secure Sockets Layer) certificates are a must for websites. Google does not entertain any website without an SSL certificate.
SSL helps block non-secure content and thus increases website speed. Almost all web hosts offer Free Lets Encrypt SSL certificates.
You need to install the SSL certificate manually for VPS and dedicated servers.
Minify Codes
Many server modules are available that can minify CSS, JavaScript, and HTML codes to optimize websites.
Unnecessary codes are a big burden for speed. Minifying codes helps in removing those extra codes and loading your website fast.
Apart from minifying codes at the server level, you can also minify codes using cache plugins like WP Rocket.
Optimize PHP setting
Shared hosting does not allow for PHP setting changes. If you use a VPS or dedicated server, you can apply the PHP setting below to get the best out of your server.
memory_limit = 128M
max_execution_time=300;
max_input_time=-1
upload_max_filesize=25M;
post_max_size=20M;
max_input_vars=10000
suhosin.get.max_vars = 10000;
suhosin.post.max_vars = 10000;
Leveraging Cloudways CDN for Faster Load Times
A CDN ( Content Delivery Network) helps you by offering seamless speed for your website across the globe. CDN uses a bunch of servers in various cities of the world. Those servers copy your website content.
So whenever a visitor visits your website, the content gets delivered from the nearest server. That is why every visitor will get almost the same speed when you are on a CDN.
Cloudflare is one of the best CDNs for WordPress. Cloudways offers an optional Cloudflare enterprise plan. I highly recommend choosing to enhance the website’s speed and security.
Using Caching Solutions and Performance Monitoring Tools
Cloudways offers the Breeze cache plugin, which is free for Cloudways users. Breeze seamlessly integrates with the Varnish cache to enhance your website speed to the next level.
Besides caching, Breeze also optimizes codes and databases and loads Google Fonts from your web directory to improve the website speed. Plenty of other features offered by Breeza may not be the topic of discussion here.
AI For Predictive Website Optimization
Choosing the Right AI Tools for Website Performance Optimization
When selecting AI tools for website performance optimization, businesses should consider data analysis capabilities, scalability, and integration with existing systems.
Choosing AI tools that align with the specific optimization goals and user experience enhancements is essential.
Integrating AI into Existing Website Optimization Strategies
Integrating AI into existing website optimization strategies involves aligning AI-driven insights with ongoing optimization efforts.
This may include A/B testing AI-generated recommendations, implementing dynamic content delivery, and continuously refining user experience based on AI-driven insights.
Overcoming Challenges in Implementing AI for Website Performance Optimization
While the benefits of AI for website performance optimization are substantial, businesses may face challenges such as data privacy concerns, algorithm biases, and technical implementation complexities.
Overcoming these challenges requires a thoughtful approach, including transparent data usage policies and ongoing algorithm monitoring.
SEO Strategies for Ecommerce Stores
On-Page SEO: Best Practices for Product Pages
Here are some of the on-page SEO practices that you should follow if you want your e-commerce store to stay tall in the crowd.
- Product Titles
- Product Description
- Meta Description
- ALT Attribute
- Breadcrumbs
- Categories And Tags
- Structured Data
Technical SEO: Ensuring Crawlability and Indexing
You must ensure that all your products are indexable and search engines can crawl those easily. You need to create a sitemap and submit it to search engines so that search engine crawlers know what to crawl and what not.
You can use Rank Math to create an XML sitemap and submit it to the search engine. You can also customize the sitemap based on your needs.
You can use structure data markup or schema markup, which is a way to add machine-readable information to a website that helps search engines understand and process content.
AI-Powered SEO Tools and Techniques
In the current landscape, many AI-powered SEO tools are available to marketers, each offering unique features and functionalities designed to streamline and elevate the optimization process.
From cognitive content generation platforms to advanced natural language processing (NLP) tools, the options are diverse and cater to various aspects of SEO.
AI-Driven Marketing Strategies
Setting Up Google Analytics and Search Console
Setting up Google Analytics and Google Search Console is essential for your site to appear in search results. The videos below show the detailed procedure.
Here is the video that shows how to set up Google Search Console and submit your website.
Personalized Email Marketing with AI
Artificial intelligence can help you hone your email strategy to craft the perfect message for every customer. You can spend less and convert more, a universal dream for all email marketers.
Here are some of the stuff that AI can do in email marketing
Personalized Emails
AI can populate automated emails with recommended items uniquely picked for each customer based on their personal preferences.
Reward Program
AI can monitor items that your customers favourited or added to their cart and alert them via email when items are almost gone, back in stock, or on sale.
Customer Connet
AI can monitor items that your customers favourited or added to their cart and alert them via email when items are almost gone, back in stock, or on sale.
Dynamic Email
AI can determine the best email frequency based on your customer’s level of engagement and automate the cadence of your email campaigns for each recipient.
Social Media Integration and AI-Powered Marketing
AI enables e-commerce businesses to create customized marketing campaigns based on customer preferences and behaviour.
By analyzing data from various touchpoints, AI can identify the most effective marketing strategies and deliver personalized content to engage customers and drive sales.
Chatbots and AI for Customer Engagement
AI-powered chatbots are being used to handle customer inquiries and provide real-time support. These chatbots can understand natural language, resolve common customer issues, and escalate complex queries to human agents when necessary, improving the overall customer service experience.
Managing Your Store with Cloudways
Using the Cloudways Dashboard for Store Management
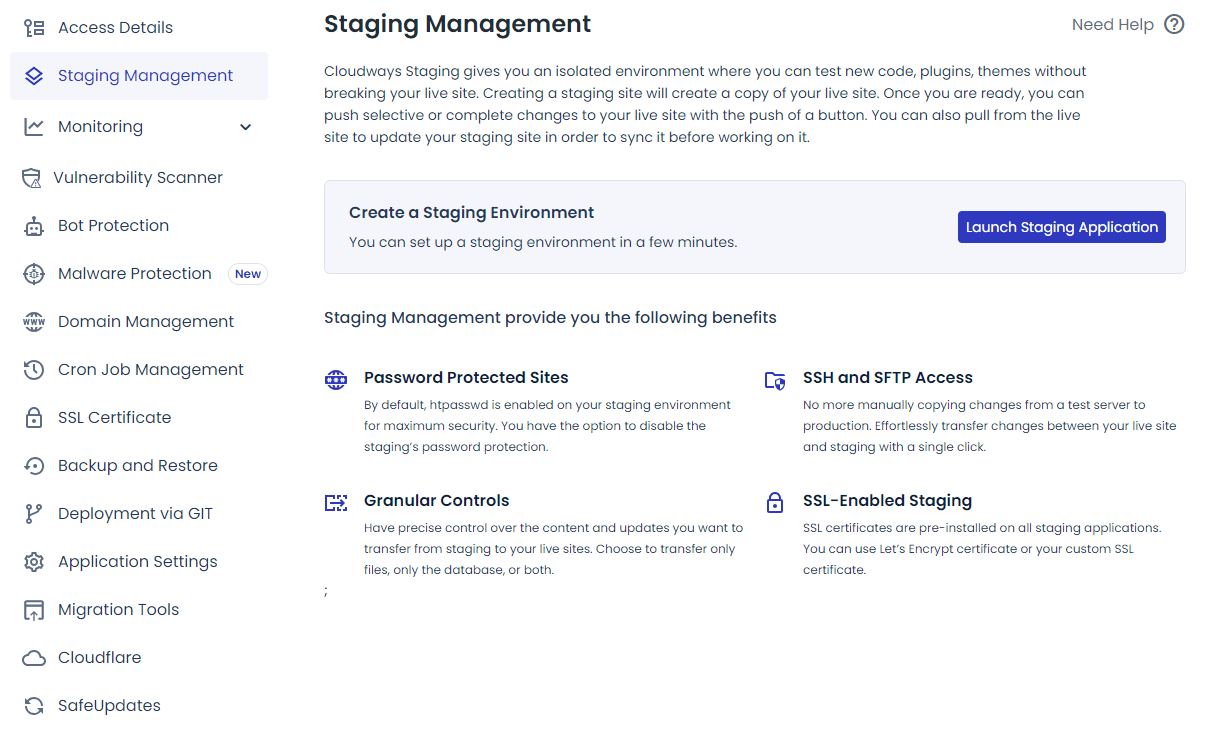
Cloudways dashboard provides a plethora of information on how to manage your e-commerce store. There is a separate dashboard for the server-level settings. You can perform the following activities on the Cloudways application-level dashboard.
- Create a staging environment.
- Monitor and change different application parameters.
- Launch security scanners and bot protection settings
- Manage domains
- Cron job management
- Install SSL certificates
- Backup and restore
- Application setting
- Migrations tools
- CDN and Safeupdate
Monitoring Server Performance and Usage
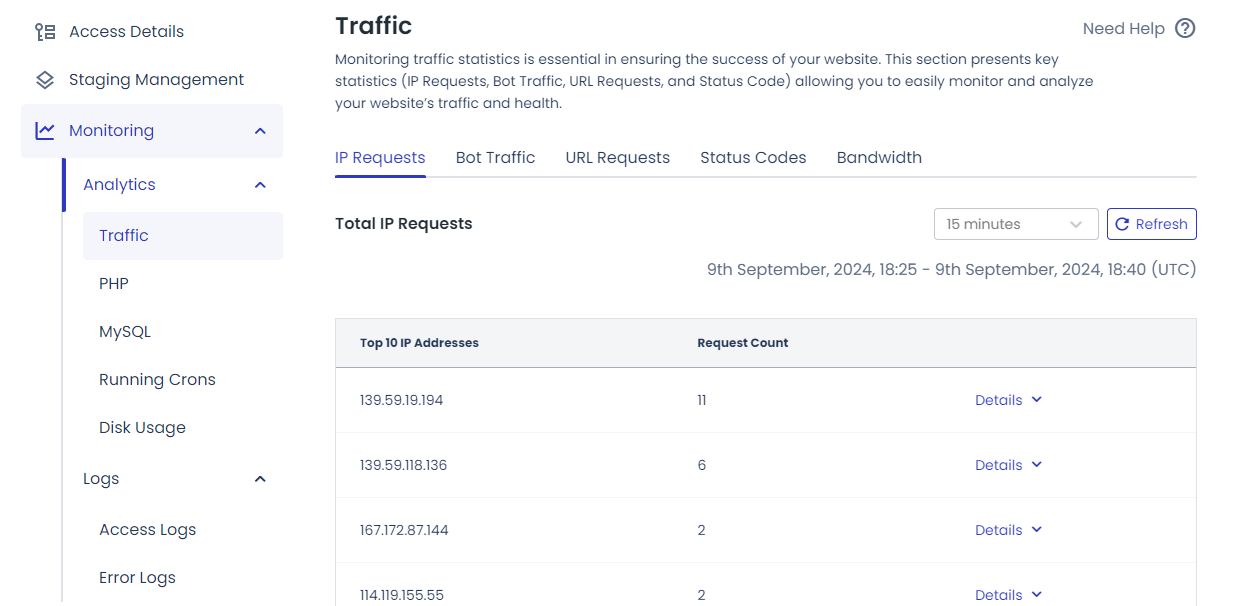
On the Cloudways dashboard, you can get your application’s in-detail performance and usage data.
You must navigate to Cloudways Application Dashboard-> Monitor->Select the option to see the analytics data.
Automating Backups and Restorations
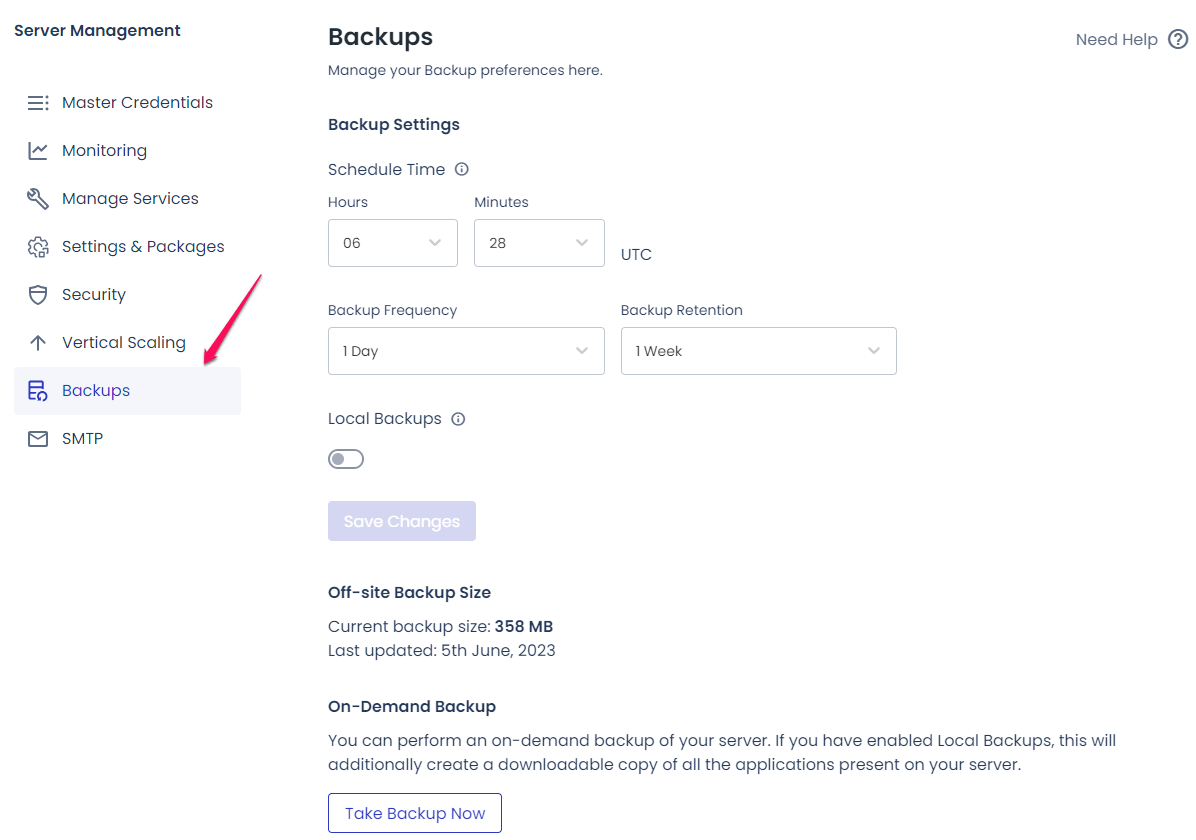
Cloudways has three backup options. Please note that Cloudways backup is not free. they charge $.50 for each GB of data backup.
- Scheduled Server Backup
- On-Demand Server Backup
- Application Backup
Scheduled Server Backup
Cloudways does a server backup automatically with a frequency of one day. However, you are free to change the frequency. The scheduled backup option is available for the whole server.
On-Demand Server Backup
If you want, you can also do the on-demand backup of your server, which can be downloaded to your local drive.
You need to turn on the local backup option for the on-demand backup.
Application Backup
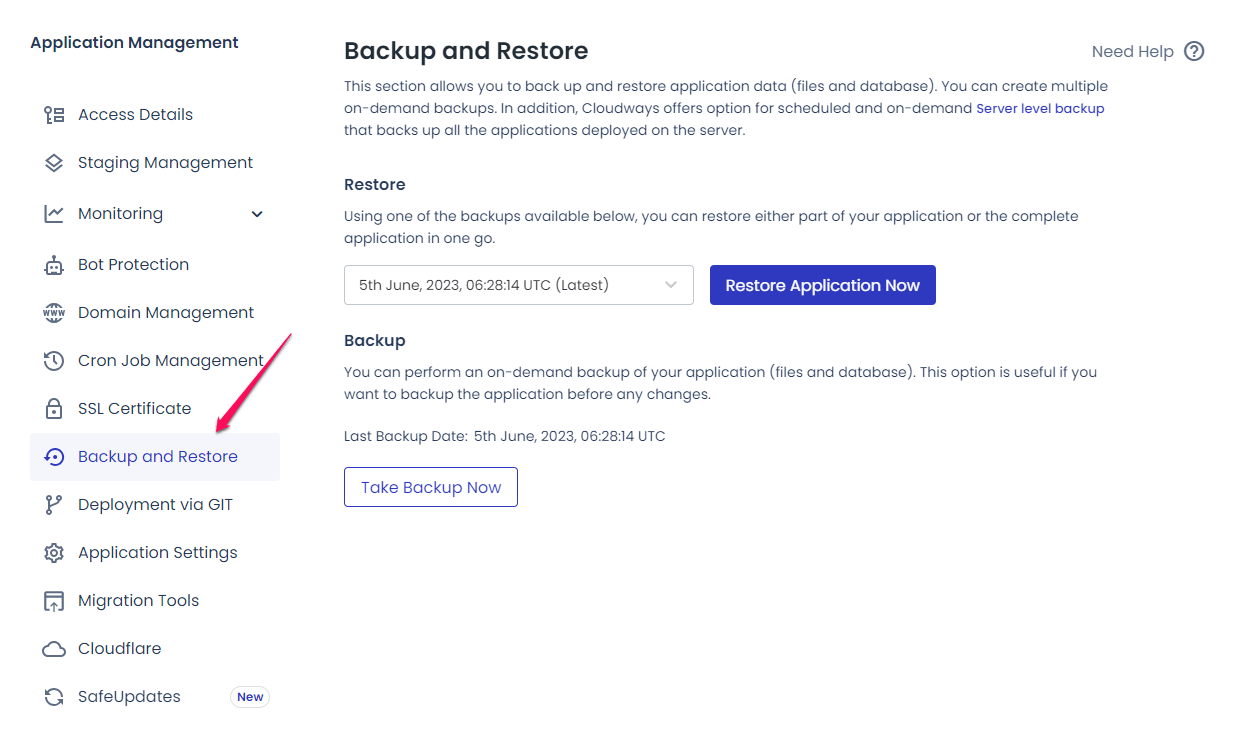
Like On-Demand Server Backup, you can also take on-demand application backup and restore it very easily when needed.
AI for Automated Customer Support
AI-powered chatbots are being used to handle customer inquiries and provide real-time support. These chatbots can understand natural language, resolve common customer issues, and escalate complex queries to human agents when necessary, improving the overall customer service experience.
Scaling Your E-commerce Business
Planning for Traffic Spikes and High-Volume Sales
You never know when your store needs additional resources. That time, you can not simply change the host with better resources because switching web hosts for e-commerce stores is not an easy job.
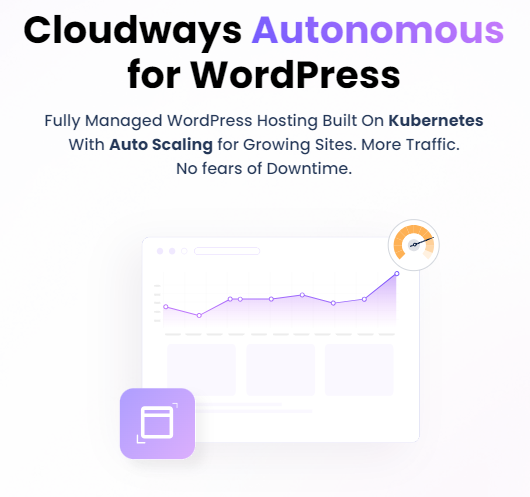
That is why we should use Cloudway’s Autonomous feature, which scales the resources based on your needs and returns them to normal when the traffic stabilizes. You only need to pay extra for the resources your website has consumed for that specific period.
Using Cloudways Vertical Scaling Features
Cloudways Autonomous is a great feature for instant scaling. It goes back to normal state when the traffic goes back to normal. How about permanent scaling?
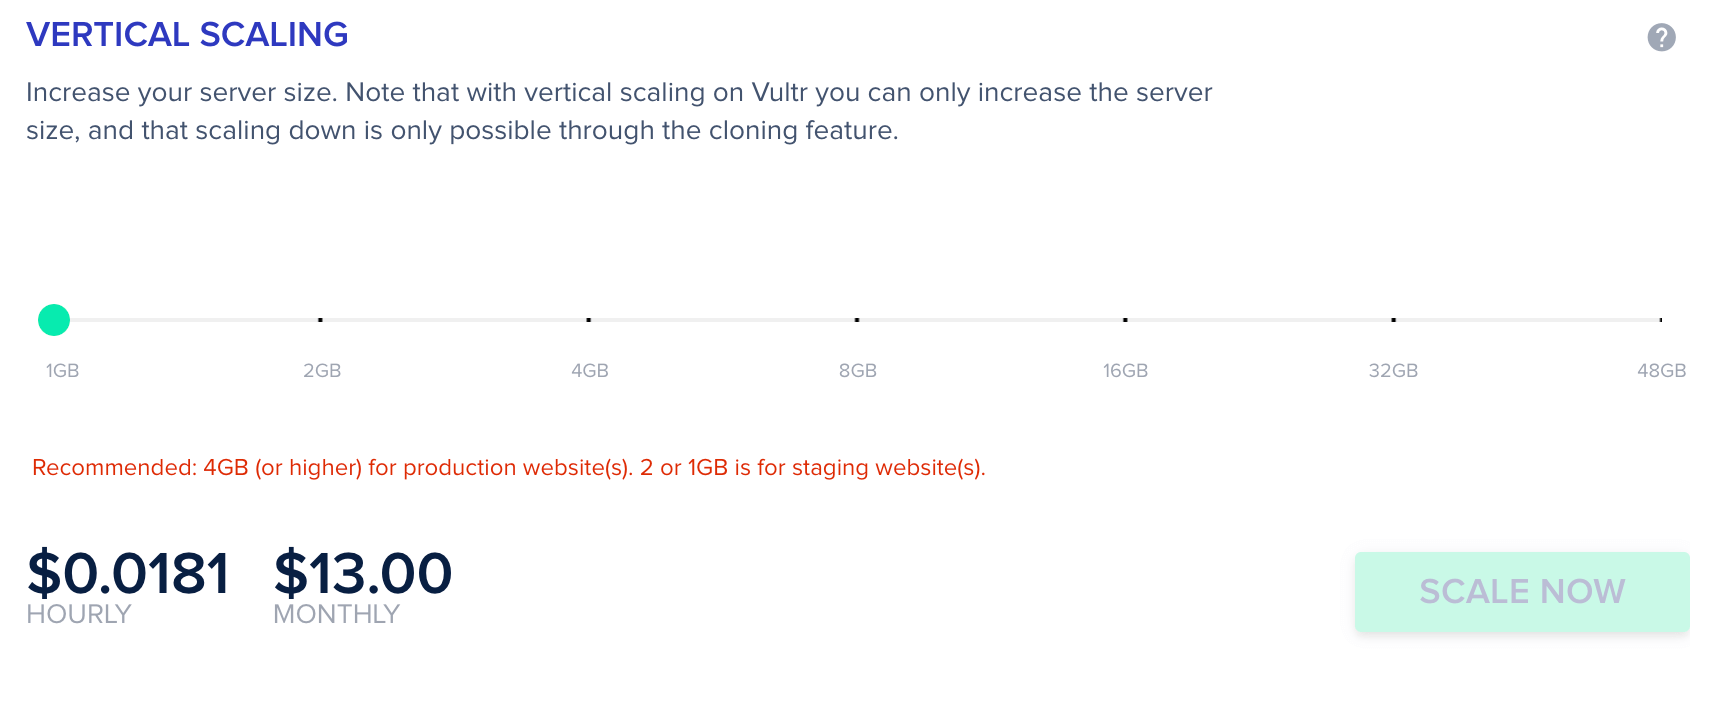
If you feel that your website traffic may increase soon, you should always opt for vertical scaling that increases the resources for your web hosting plan without switching to a new host.
Cloudways offers vertical scaling without any noticeable downtime. You can always change your resources whenever you want.
Conclusion: Building a Successful E-commerce Store with WordPress, Cloudways, and AI
eCommerce is the future of doing business smartly. And your decision should be smart enough to sustain the changes.
Building a WooCoomerce store hosted on Cloudways could be the best decision for your online business. You can expand or scale your online business without switching your hosting provider.
With the overgrowing impact of AI, it is always preferable to start with the best in the market. Cloudways and WordPress are the best resources to start your eCommerce journey.